Workshop Plus
WORKSHOPS 2025
- Latest posts:
- Susan Wk4
- Ida Wk7
- Debra Wk2
- Carolyn Wk7
Susan (Assisted Online Intermediate)
WEEK 4 EXERCISE 1
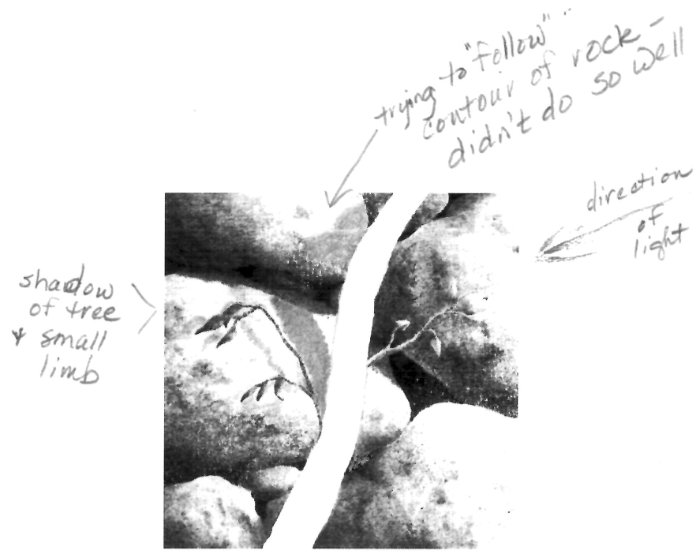
First, this scene already contains cast shadows where each rock has cast its shadow on the rock below. There is only one light source so the direction and intensity is constant throughout. That being so, every cast shadow will be the same tone, and I'm happy to see that your tree's shadow is about as close as you get it to match mine. Well done.
You've also correctly understood the three-dimensional form of the rocks, and that they will distort the shape of the shadow. You cannot simply copy the shape of the tree.
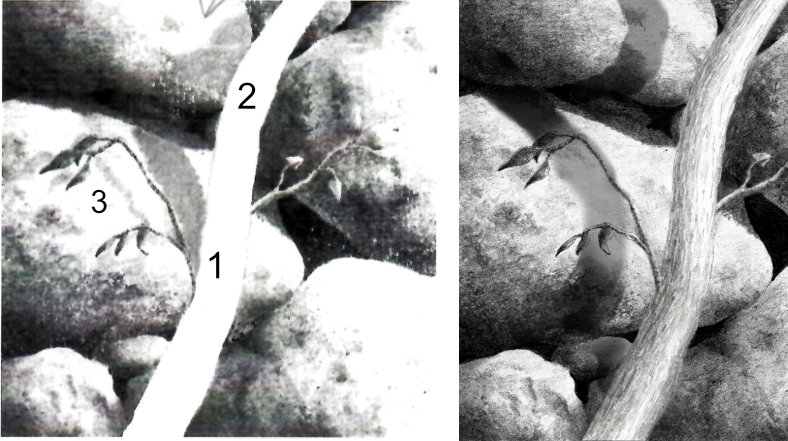
I must mention that at "3" you included the shadow of the side branch. There was no need to do that. Indeed, it often causes confusion by over-complicating the image. Only include the shadows that relay important information to us. The shadow of the tree describes:
• the three-dimensional form of the rocks
• how far away the tree is away from thr rocks and
• the quality of the light (strong sunshine in your case)
The shadow of the branch adds nothing, but takes attention away from the far more important shadow of the tree.
As the rock's surface curves away from the tree, the shadow has further to travel and will be further away from the tree. I'm not concerned about the bits of rock at the base - the shadow would be too broken and complex for anyone to try to understand it. Above that, across the central rock, your shadow suggests the tree is leaning away from the rocks and that the rock is completely flat. That's not impossible, but probably unlikely. You see how my shadow curves under the rock? That's because the shadow has further to travel as the rock recedes away from the tree.
These are round rocks; their front surfaces curl back underneath them, and the tops lean away from the tree. Your shadow should follow those curves. Look how my middle shadow doesn't just follow the top rock up its surface. Instead it steps to the right. That's because I decided the top rock is closer to the tree than the middle rock is - it's jutting out, and its cast shadow shows that to be true.
On the definitely plus side... you've cleverly avoided a common problem: Your shading of the shadows is NOT linear, with lines that are quite visible. That never looks realistic because - as you did! - you need to use a rock-texture shading technique. Many artists on this courser have shaded the shadow as though it is an actual body, but it isn't, it's simply an area where less light reaches the rock. Therefore, the shadow IS rock and has to be shaded using the same technique you used for the rock. Well done for that!
Ida (Online Advanced)
WEEK 7: EXERCISE 1
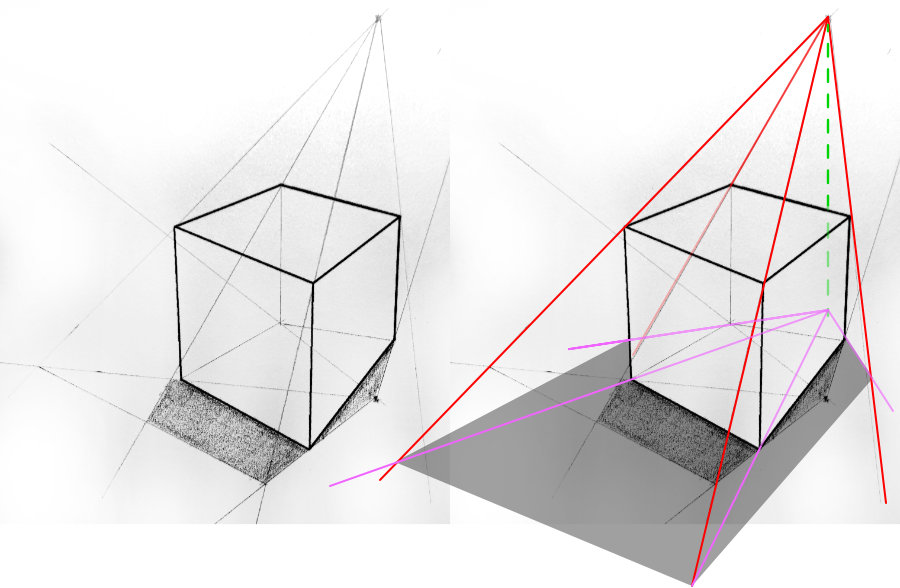
Now, imagine you are the light... now what can you see from up there? Which are the furthest edges you can see that might block your vision of the ground?
Here (as I'm square behind the cube) I can see all four corners of the top. So, apart from the face that's facing me, the other three faces will all cast a shadow. Now imagine where your line of sight for each corner meets the ground, allowing for any unevenness. Fortunately, great accuracy isn't required. In fact, as long as you aren't obviously wrong (two light sources casting single nearby shadows, for instance) almost anything is acceptable.
So, imagining you're the light... the shadow makes sense of what you CAN and CAN'T see. Cast shadows are simply the area the light cannot see.
And, as we instinctively understand shadows, you can use the shadow to tell the viewer an enormous amount about the surface that the shadow is falling on.
They tell us about the light - its position, height, and intensity. While the human mind will baulk at understanding anything that clearly cannot be true, it's very likely to accept a wide variation as long as it's logically correct. So, your shadow and mine both serve the same purpose. The shadows are themselves of no importance. But they subconsciously add a LOT of Information.
I must also add - without, I hope, creating confusion - you can work the other way round too. Imagine you are a tiny person on the ground looking up at the light. Move towards the object and when the light disappears, now you're in the shade. Both, imagining you're the light or on the ground, work well, because they constantly remind you of the three-dimensional form of the object.
STOP! I just noticed that you DID include the ground plane! But then you placed it to one side of the cube (where I placed mine behind) and confused yourself about the placement and direction of the light. So you eventually produced a drawing with BOTH the shadow AND the light on the same side of the cube... which is what confused me.
WEEK 7: EXERCISE 2
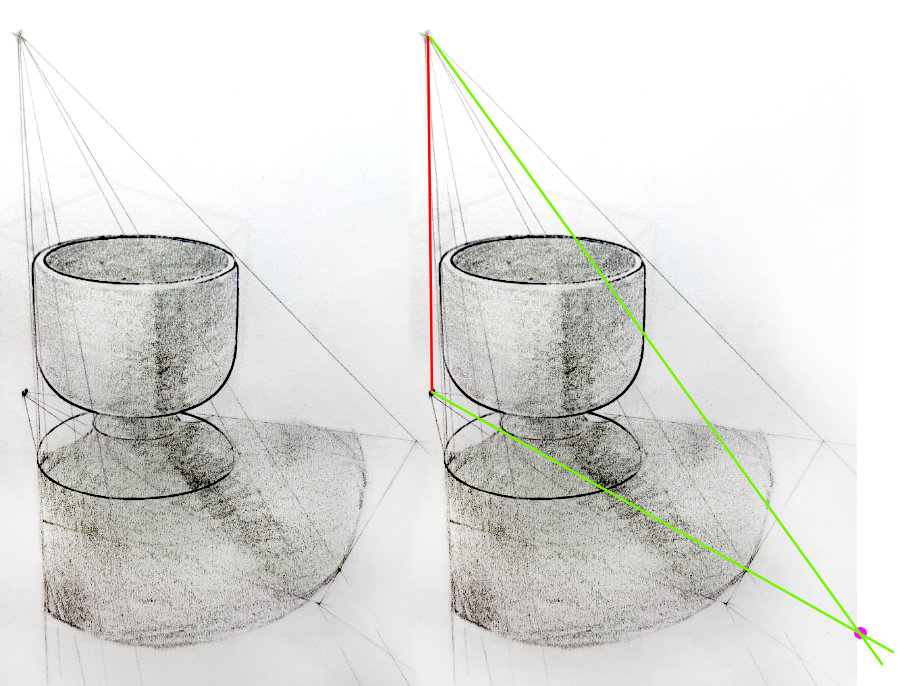
I struggled with this one and is not
sure at all I got it right...
I've found it's trying to draw shadows that actually makes you notice them. We see shadows every day and we instinctively know how to decode them - what they tell us about the object casting it, the quality of the light, the time of day, the season... And also about the surface that the shadow falls on. We understand all those things but we don't "see" the shadows.
I can follow your approach. It grounds the eggcup, but it doesn't extend far enough. And I think there should be an indent at each side that describes where the cup curves underneath to meet the stem.
I'm sure the direction of the cast shadow is correct, but I'm equally certain it's not long enough. So, I checked...
Here's one I prepared earlier...
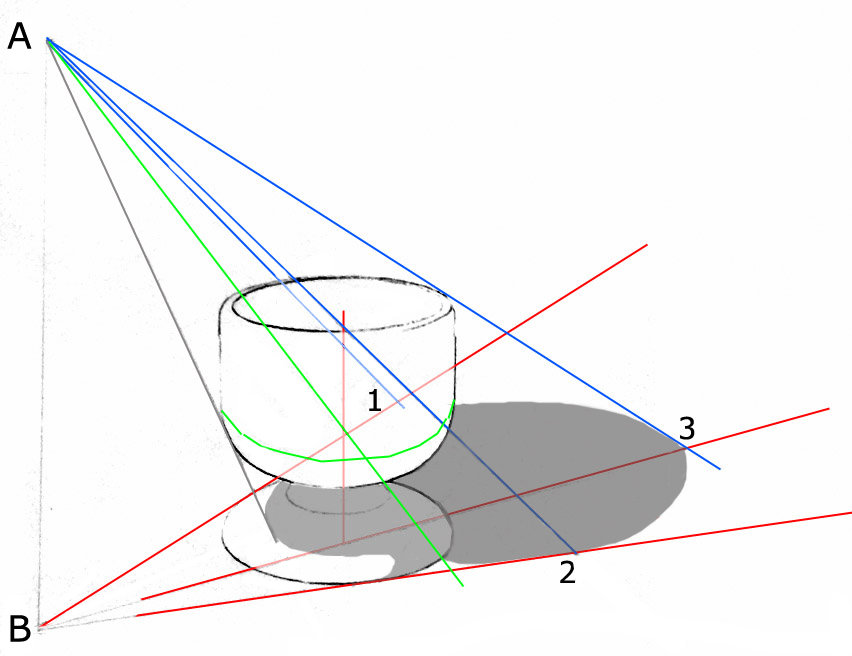
Red 1 and 2 give me the maximum width of the shadow. I'm assuming the cup and its base are the same width.
Blue 1 and 2 pass both sides at its widest point (as seen from A), which gives me the points at which the curve of the shadow meets the shadow of the sides.
Green is a line around the cup where the vertical side begins to curve underneath. the green ray passes through that curve (directly under the blue "widest point" above) so I now know where the shadow begins to curve back in. That's what I think should be shown on yours - even if you have to invent those indents.
The grey line marks where the shadow of the cup begins on its base.
The rest is eyeballed.
Enclosing it in a box won't work, because the corners of the box will all extend further out than the object itself. Construct the ground plane lines. Then, again, imagine you're the light. What can't you see from up there?
WEEK 7: EXERCISE 3
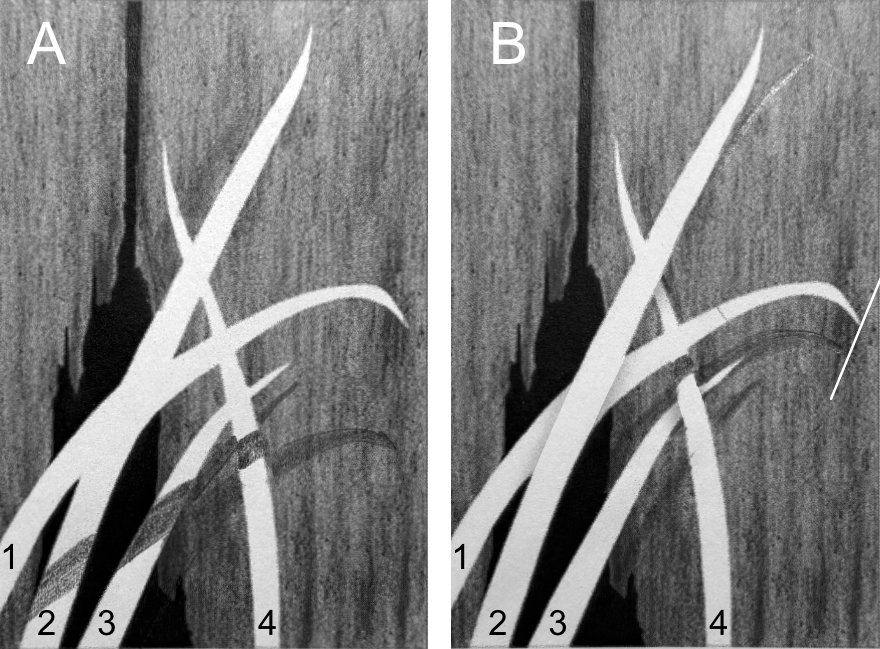
• Leaf #1 must be in front of the other three because it's casting its shadow on them. And the shadow tells me all three are about the same distance from the wall.
• Leaf #2 is behind Leaf #1 and is possibly bending back behind leaf #4, because it does not cast its shadow on #4, and #4 is probably hiding its own shadow at that angle.
• Leaf #3 is alongside #2 and, like #2, it must be behind #4, because it's not casting a shadow on it. Again, #4 is in front of its own shadow and hiding it. You could bend the truth at that point and just allow a hint of shadow to show, which would save us any guesswork.
• Leaf #4 Is in front of all the leaves except for Leaf #1. That's fine, it all makes sense, but hints of shadow wherever one crosses another would make every more clear.

If we connect the end of Leaf #1 to its shadow, we know thee direction of the light. So...
• Leaf #2 must be in front of all the other leaves, and directly in front of its own shadow and hiding it. I'll add a little shade to make that more clear.
• Leaf #1 is behind #2 but casting its shadow on #4, so it's in front of it.
• Leaf #3 must be behind #4 because it's not casting a shadow. Again, I'll give just a hint of one.
• Leaf #3 is casting its shadow on the wall, but the tip of the shadow doesn't agree with the direction of the light. BUT it tells us #3 is not touching the wall and (while being "wrong") is quite acceptable.
• Leaf #4 is also casting its shadow on the wall and that doesn't agree with the lighting direction either - but it does its job and is probably going to be OK.
I hope this exercise proved to you how important and effective shadows are - even when the elements themselves contain no three-dimensional shaping.
Debra (Assisted Online Intermediate)
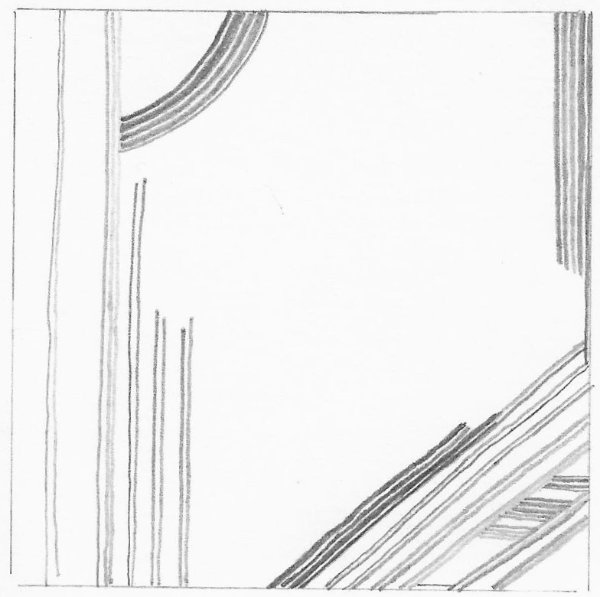
WEEK 2: EXERCISE 1
WEEK 2: EXERCISE 2
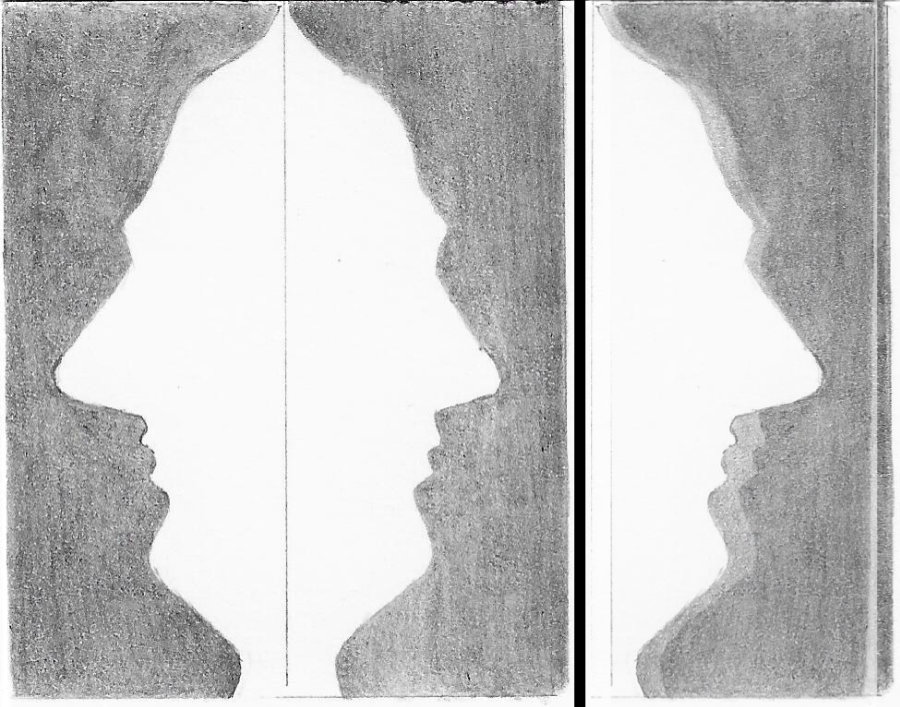
I did not do the cutting and switching as I am aware of this exercise and I wanted to get on to the next exercise.
Fair enough!
This is a very accurate result. As with Susan's, I flipped the left-hand half over onto the right-hand half... and apart from the longer nose, they're remarkably similar. Well done!
WEEK 2: EXERCISE 3
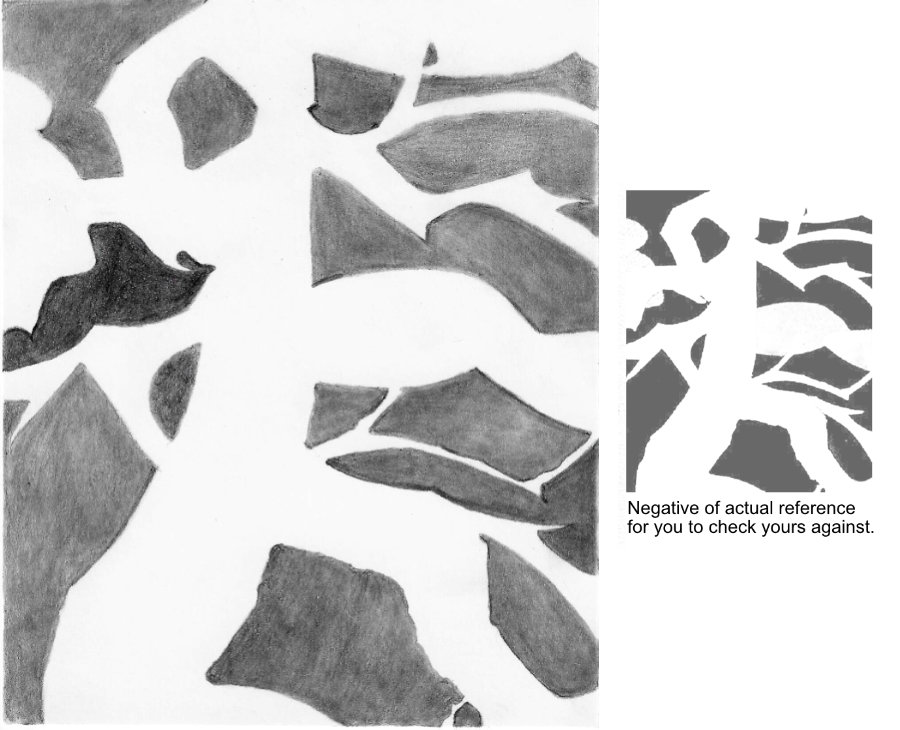
This was hard! I found I often saw what needed to be a bump or projection in the negative space and did not interpret it correctly. I can see why you emphasize practice. Overall, I " get" the concept but the devil is in the details.
Good work, Debra, this is virtually flawless. Keep practising. Once you become used to seeing negative space, you'll find it's an incredibly powerful tool with a myriad of uses - especially when you have problems correctly seeing a positive shape. Switching to drawing the negative spaces around it almost always solves the problem. And the good news... it becomes progressively easier with practice.
I also learned a lesson.. I got so involved in trying to get a shape correct that I forgot to move the card that protects the work from my hand. When I finished, I discovered I had smeared half of the picture. Not funny! Glad I learned that on a lesson and not on an actual piece. I tried to correct the smear as best I could but as you have mentioned in the past, it will never be the pristine white.
I'm really pleased that happened and that it happened when it did. It is unlikely you'll make that mistake again, and this time is was of little consequence.
I once found a fingerprint of mine in an otherwise flawless sky. Fingerprints cannot be removed, so I spent two days painstakingly darkening the sky around the fingerprint until it disappeared. Never again will I cause that to happen!
WEEK 2: EXERCISE 4
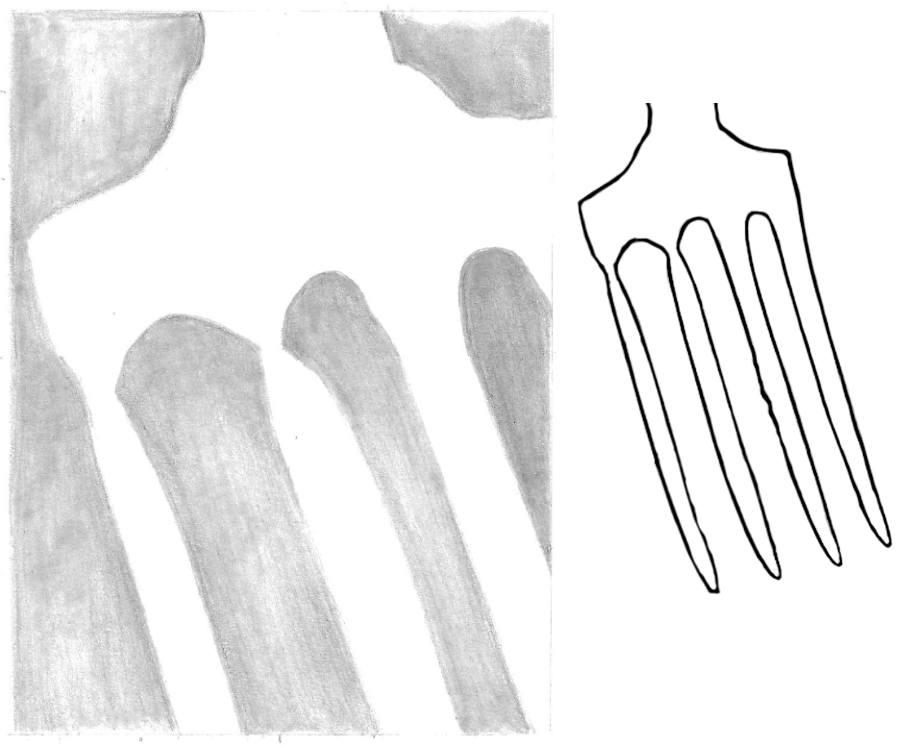
I did find the curve at the top of the middle negative space very interesting. When I was looking at the reference photo after finishing the drawing I realized I would not have understood that area looking at the positive. I absolutely would have struggled with it.
That's one reason why I chose this fork. It's so easy to think you know what it should look like without double-checking to discover it's quite different. You have slightly exaggerated it, but at least you did really see its shape. The tops of the gaps between the other two tines are looking good.
If I did this again, I would still mark on the outside of the frame, the centres of the top and sides. But I would then trust my eye to hand.
Ultimately, just the result matters, not how you achieve it... as long as you are aware that what you think it looks like is not necessarily what it actually looks like. And having the ability to see the surrounding negative space is very often a great way to observing something for what it really is - because it's just an organic shape for which your mind cannot be storing any "recognition" or "recognisable features".
Carolyn (Online Advanced)
WEEK 7 EXERCISE 1
I have trouble understanding the directions, but I think this shows that I should take a box out in the sun and look at it in real life! Only then will I fully understand, I think.
That really is the best solution. I learned with an array of objects and a desklamp - but the principle is the same. And as soon as it begins to all make sense, you'll find it so much easier to just create shadows on the fly.
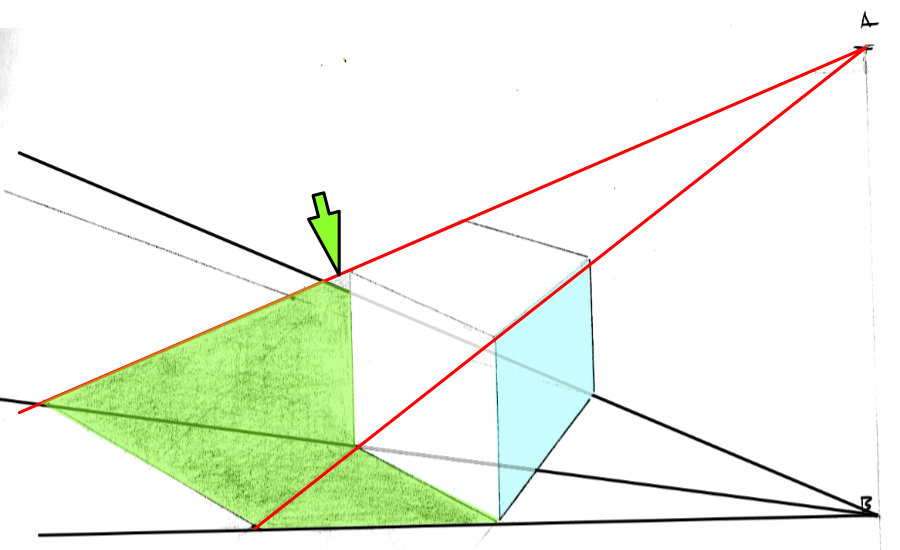
As A is directly above B, A can only see the light blue face and the top. So my red lines follow the corners I can see from up there.
Everywhere else, the light can see the ground. You've made life a little difficult for yourself because one face of the cube exactly follows the same red line . But you were almost entirely correct - just the tiny arrowed section was wrong.
OK.. let's move on to VERSION 2:
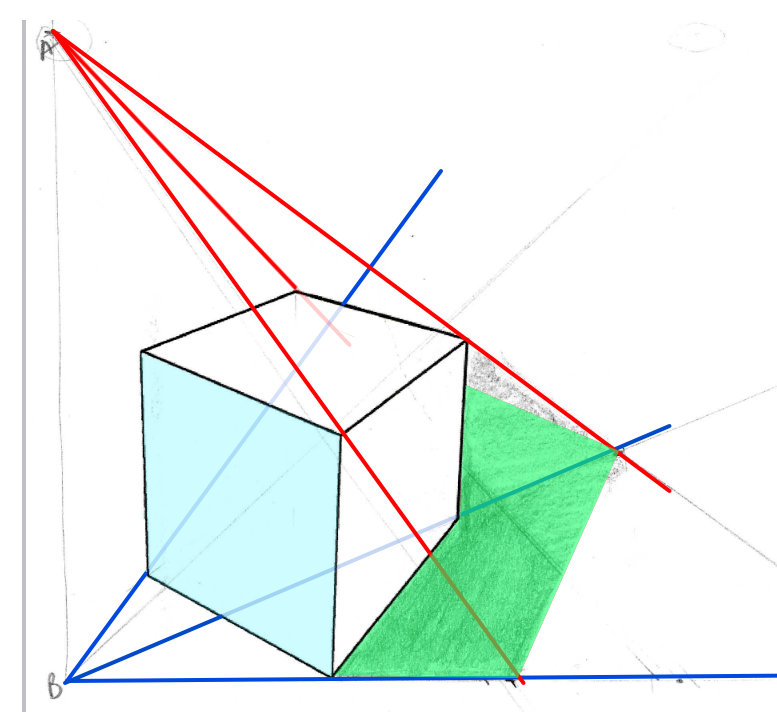
This might help you - assuming you need it!
Now what can you see from up there? Which are the furthest edges you can see that might block your vision of the ground? From up here (as the light) I can maybe see the top's left and right-hand corners and the far corner. The near corner doesn't count because I can see all the faces that spring from it. Now imagine where your line of sight for each corner meets the ground, allowing for any unevenness.
WEEK 7 EXERCISE 2
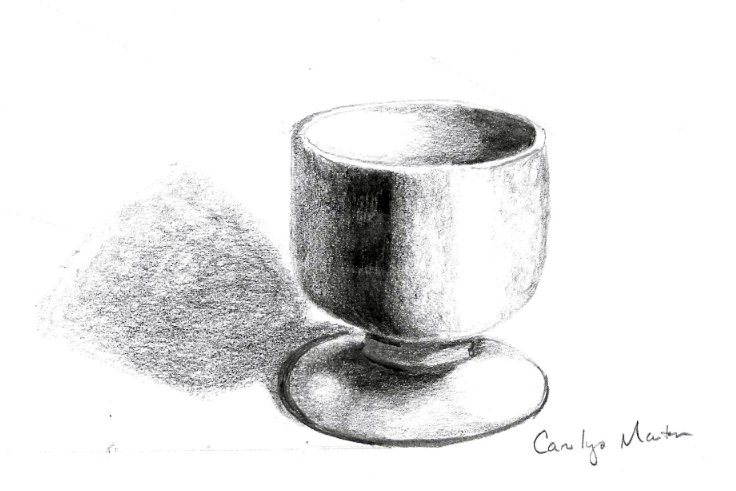
I'm not sure how to apply the angles for figuring lighting to a rounded object... I'm not happy with it but want to see what you say.
I'm sorry I haven't the time to work this out completely, but I have this one stored from a previous session, which is very similar:
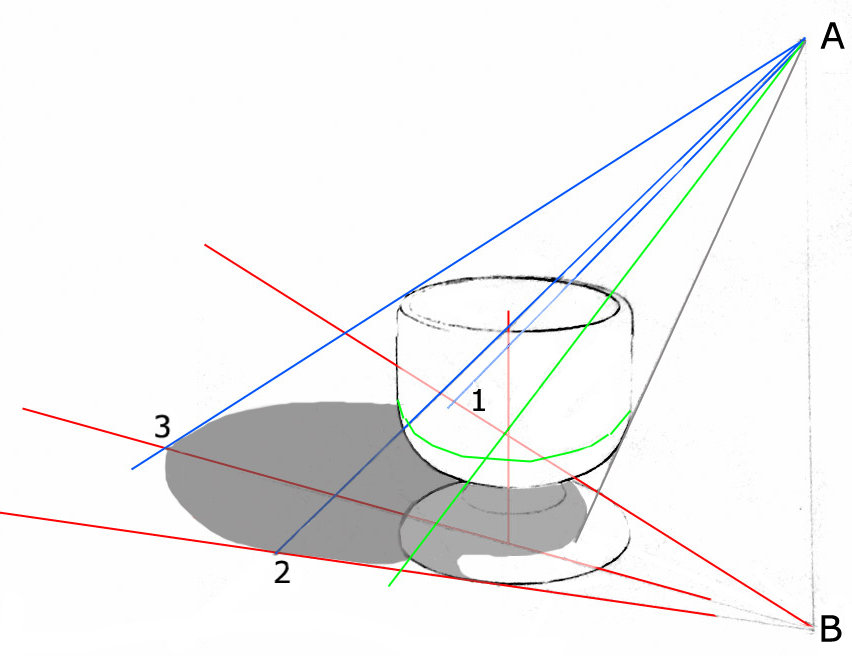
Red 1 and 2 give me the maximum width of the shadow. I'm assuming the cup and its base are the same width.
Blue 1 and 2 pass both sides at its widest point (as seen from A), which gives me the points at which the curve of the shadow meets the shadow of the sides.
Green is a line around the cup where the vertical side begins to curve underneath. The green ray passes through that curve (directly under the blue "widest point" above) so I now know where the shadow begins to curve back in.
The grey line marks where the shadow of the cup begins on its base.
The rest is eyeballed.
Enclosing it in a box won't work, because the corners of the box will all extend further out than the object itself. Construct the ground plane lines. Then, again, imagine you're the light. What can't you see from up there?
WEEK 7 EXERCISE 3
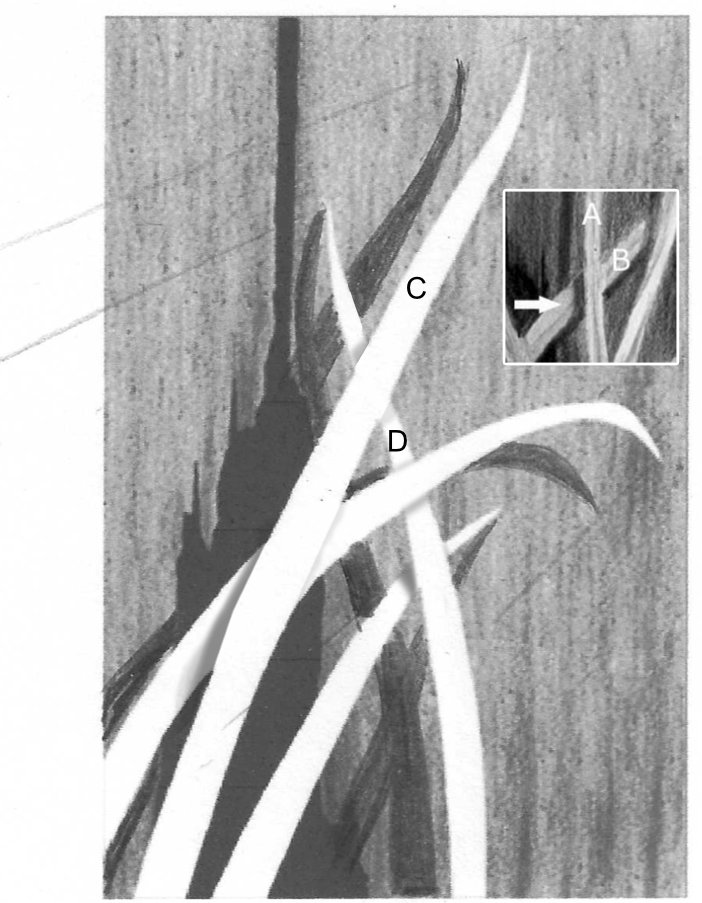
Otherwise this is very good. Those lines are exactly what you needed to do. This is splitting hairs a bit but, because this is sunlight, they should ALL be at the same angle. Due to its extreme distance as a light source, you can always assume sunlight rays travel in parallel straight lines. Also, your sun is very low in the sky, which is why my shadow cast by Leaf C on Leaf D is above the leaf rather than below.
But what really matters is that your cast shadows on the wall instantly describe the way each leaf bends, and their distance from the wall at any point. It's clearly obvious that some leaves bend back to touch the wall and others run parallel to it or lean back slightly.
As for the internal cast shadows... The further away the surface is from the leaf, the further the shadow has to travel. When the shadow of a leaf is projected both onto the wall AND another leaf, the shadow will split. The shadow of A on B (arrowed) has less distance to travel so it is nearer to A than the shadow of B cast on the wall.
In your drawing, the shadow of Leaf C on D has less distance to travel so it is nearer to C than the shadow cast on the wall. The shadows depend on which you think is in front of which, and what the angles of the leaves are. I've also introduced a little darker tone along the other edge of each leaf, just to define it. That's OK, but it has to be very subtle.
I hope this exercise proved to you how important and effective shadows are - even when the elements themselves contain no three-dimensional shaping.
Tutorials
by Mike Sibley


