Tips & Techniques
Drawing TREES
Artists often ask me for assistance with the drawing of trees. As with most subjects this one can be broken down into easy-to-manage parts - as I shall explain...
Balance and Form
First find your tree. This is not as easy as it might appear... trees have a habit of looking unbalanced, awkward or just plain crazy! Despite Nature's best endeavours, not all trees make good subjects. Finding one with the appearance of good balance can take some time.Maybe you prefer to design your own? The same rules apply. Unless a leaning or grossly unsymmetrical tree is going to be of some advantage to your drawing, you would benefit from first studying trees and their growth habits to learn the basic rules. Personally, I nearly always work from photographs that I use as a base from which to work. I might occasionally draw one just as I saw it but often I will amalgamate elements from two or more trees into one. But, whatever your approach, one aspect remains constant - trees posses three-dimensional form. For simplicity I will concentrate on common deciduous trees but similar rules and techniques will apply to evergreens.
Overall Form and Structure
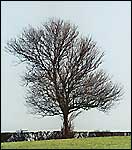
 Trees are not flat structures of entwining branches. Some branches will extend to each side, some will recede beyond the trunk and yet other will be pointing straight at you. A country walk in Winter offers a good opportunity to study this. Later, when the trees are clothed in leaves, you can study the same ones again but with a full knowledge of their internal skeleton.
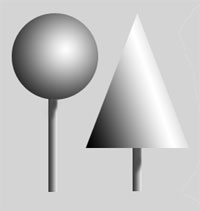
Brought right down to basics, a tree in leaf is like a lollipop or candyfloss on a stick - a round or conical shape on a long pole. You will see that these basic, three-dimensional shapes conform to normal lighting expectations. They posses a shaded side, a highlighted side and a shadow beneath. You may also incorporate reflected light on the dark side of the trunk if it will help you to better show it's edge.
Keep this basic shape in mind as you work, coupled with the chosen direction of light, and the tree that you produce will possess an overall reality of form.
Analysing what you see
There are, to my mind, three major aspects of a tree that make it what it is. Surface texture and shape, internal bough structure and gaps through which you can see through to the other side.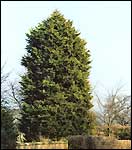
Texture and Shaping
These are two major topics that I will return to later. For now just be aware that your tree must look as though it is clothed in believable leaves. It's while you are drawing these "leaves", keeping the lighting direction in mind, that you will introduce the external shaping.
Internal structure
Whether you are drawing hair or grass or the boughs of a tree one important point extends to them all — what you start you must finish. Nothing looks more false to the eye than a bough that springs from nowhere or one that simply disappears. Make your internal structure believable and the eye will accept what you draw as reality.
Holes and gaps - negative areas
Holes through the foliage are a great boon as they enable you to show the far side of the tree and add reality to your drawing. And these holes and gaps often expose the hard edges of the boughs - using these in stark silhouette (they rarely receive direct light) contrasts well with the more enigmatic foliage and can be used to impart a softer look to the leaves.Let drawing commence...
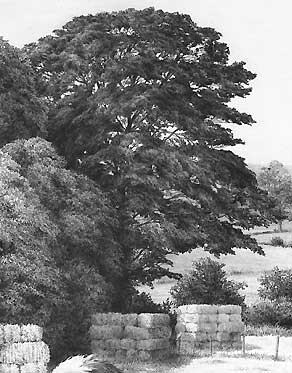
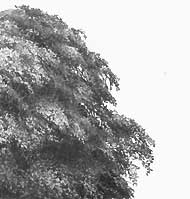
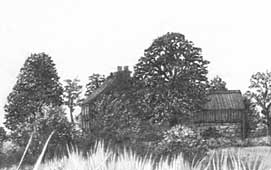
Think of your tree not as a drawing but as a sculpture - a three-dimensional surface wrapped around an internal armature. The first job then is to create the armature with indications of where the major masses of foliage will be appear.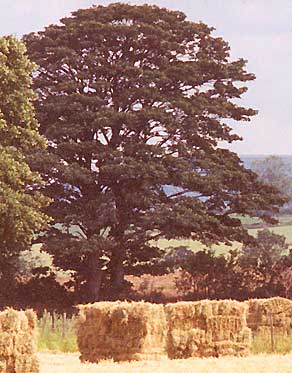 This tree was photographed with a 200mm zoom lens at a distance of about 150 metres. The lack of detail is not important - indeed it is a bonus as it concentrates attention on the forms within the tree.
The internal structure is nicely silhouetted allowing the eye to follow the major limbs through the structure.
I incorporated this tree into the composition of my drawing Done Balin'.
 The internal structure has been explored to some extent, the major holes through the foliage mapped out and the main areas of shadow noted.
Note that the tree originally had two trunks. One has been removed and the emphasis placed on the centre and right of the tree as the composition requires other trees to overlap the left side.
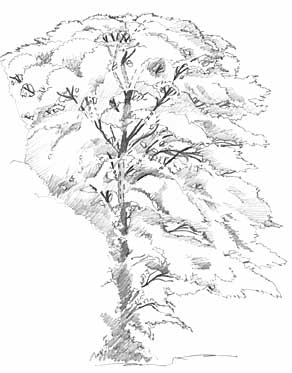
This is not drawn on the final working surface but is a separate sketch for later transferral. The benefit of this is that it allows unlimited exploration of the form - in this case the masses of foliage tend to have rounded tops when viewed straight on and others to the side sweep downwards as they decrease in depth. We can put this understanding to good use later.
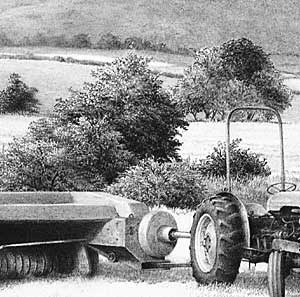
 The completed tree as it appears in Done Balin'. Note that the left-hand side is invented, the right hand side conforms only to the photograph's outline and some of the holes through the foliage have been closed.
Only the "spirit" of the tree has been used to depict it - the actual structure of the foliage masses has been altered to better suit my requirements. Photographs can provide detail but they are better used as compendiums of overall information - they give a "feel" for the structure and add realism to your invention.
Demonstration...
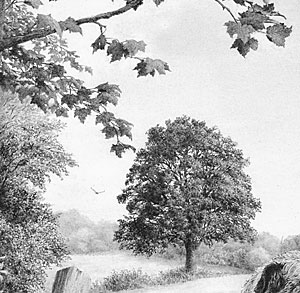
To make life easy the "clothing" of a tree can be broken down into a collection of similar elements. Just experiment with small sections until you arrive at a texture most resembling the effect you wish to attain. In this case the tree is in the midground so the "leaves" only need to appear as highlighted points where light reflects from their variously angled surfaces.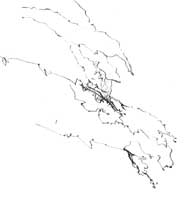
The basic guidance drawing. This exercise measures 2"×2½" and was completed in just over 1 hour.
Here I'm establishing the darkest and lightest tones and beginning to get a feel for the form. Don't add tone yet to the white, negative points.
When you've established and delineated the shadow and highlighted areas, add overall tone to provide lighting that conforms to your chosen direction.
- Map out a loose framework for the internal and external structures.
- Working in random patterns, create a flat depiction of depth. By this I mean vary the weight of your pencil marks, graduating from dark to light, leaving more negative space between the marks as you progress. This method involves a combination of negative and positive drawing - the shadows rely on the positive, weighty pencil marks and the highlighted areas are produced by drawing around the white "leaves". More leaf, more highlight. Less leaf, more shadow. Work quickly - speed fools the brain. Tap into your creative side by working too quickly for your logical side to keep up.
- Finally, reinforce your deepest shadows (leave no negative spaces) then add overall tone as required to each area of foliage so it possesses a roundness that conforms to your chosen direction of lighting.
Adjustments can be easily made with Blu-Tack, which is why I advocate placing the final shaping-tone on top. Blu-Tack can lift this off so gently that the detail below is left undisturbed and can be continually adjusted and re-adjusted with little harm to the under-drawing.
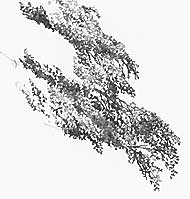
With practice some of the early stages can be dispensed with. For example, the trees to the left of our example tree (see below) merely had their positions marked in my line drawing. The trees themselves grew organically as I worked. I had only to decide where the sun would catch their tops before starting out.

Done Balin' — limited edition print
Trees and Foliage examples...
TOP TIP
Don't get obsessive about the time taken to complete a drawing. Taking longer doesn't necessarily mean "better". If the drawing took three weeks to complete then that's what it required - it wouldn't be any better for a month spent on it. In fact, taking too long may result in the drawing being overworked. When you begin a drawing don't have any preconceived ideas about how long it will take. It will take as long as it requires.
Available here...

320gsm super-smooth Brilliant White paper

The ultimate versatile kneadable eraser
288 pages of drawing techniques and more...

Pencils, Starter Packs and accessories...
320gsm super-smooth Brilliant White paper
The ultimate versatile kneadable eraser
288 pages of drawing techniques and more...
Pencils, Starter Packs and accessories...
