Tips & Techniques
GRID METHOD of RESIZING
Early times
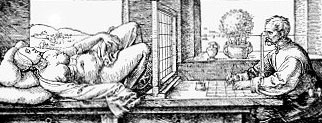
Artists have been using mechanical aids for centuries. In the 15th and 16th centuries, for example, a Master would draw on paper his complete design for a fresco, then his assistants would transfer an area of that design to damp plaster sufficient for the day's work. This they did by pricking holes along the lines of the drawing, holding the paper up to the plaster surface and then "pouncing" (pummeling) the lines with muslin bags of soot or carbon. The artist could then continue his work assisted by a representation of his drawing in the form of closely spaced black dots.
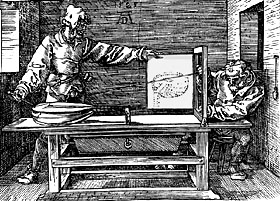

 Using this machine, sighting from a fixed point, he would look through a grid of strings and transfer what he saw onto his drawing surface, which carried a similar grid.
Replace the 3D object with a 2D sketch or photo and you will see that Dürer was using a precursor of the now common grid method of sizing up (or down).
You may have heard it suggested that the use of such contrivances in some way diminishes the "art". I strongly disagree with this. Had Dürer had the use of a camera to convert his three-dimensional forms to more manageable two-dimensions, he would have used it.
Walter Sickert (1896-1948), who in his later years based much of his work on photographs, answered his critics by saying that the only test of any artist was the finished product, no matter what preparatory steps had gone into its making.
Pre-draft Planning — To fail to prepare is to prepare to fail
 There are only so many changes you can make to your drawing before damage results so it's preferable to refine your study during earlier stages. I'll assume here that you begin (as I do)
with a small, manageable line-drawing. It is at this stage that major changes and decisions are made, the composition finalised and problematic areas sought out and resolved. If you are basing your drawing on a photograph, you may be tempted to size-up and transfer your photo to your working surface in one step but I would council against this approach - you will also be transferring potential problems that occur naturally in the photo but will destroy or unsettle your finished drawing. The removal of the background, for example, may show up distracting (natural) lines that run through your drawing that now upset its balance. Using the intermediate step above will allow you to fix optical errors and create a new man-made "natural" balance that adds harmony and pleasure.
There are only so many changes you can make to your drawing before damage results so it's preferable to refine your study during earlier stages. I'll assume here that you begin (as I do)
with a small, manageable line-drawing. It is at this stage that major changes and decisions are made, the composition finalised and problematic areas sought out and resolved. If you are basing your drawing on a photograph, you may be tempted to size-up and transfer your photo to your working surface in one step but I would council against this approach - you will also be transferring potential problems that occur naturally in the photo but will destroy or unsettle your finished drawing. The removal of the background, for example, may show up distracting (natural) lines that run through your drawing that now upset its balance. Using the intermediate step above will allow you to fix optical errors and create a new man-made "natural" balance that adds harmony and pleasure.So, you're happy with the result and now you need to enlarge your line drawing and apply it to your final drawing surface — here's how...
The Grid method of resizing
When sizing-up from a sketch you can lightly draw a grid of regular lines on the drawing itself or (as with photographs) you can use a suitable, fine pen to draw your grid on an acetate sheet. The acetate method is preferable as you have a permanent, ready-to-hand grid for all occasions. The smaller you make your squares the more accurate your copy will be. I found that a grid of ½-inch (1cm) squares was quite adequate for a 6"×4" photograph.But I thought Mike advised against sourcing direct from a single photograph? True - but you can size-up twice! First translate your photograph into a larger (but manageable) line-drawing then size up the line-drawing to the final dimensions required. Why? Your line-drawing provides many advantages. It gives you the opportunity to make alterations. If for example, you are drawing a dog, this is the ideal time to incorporate changes of expression, open or shut the mouth or move that awkwardly lolling tongue. It also removes all three-dimensional shading, which makes applying the lighting as you want it far easier. But above all, it greatly increases your understanding by getting you in touch with the form itself, not just its photographic representation. OK, sermon over! Lesson time...
- Lay your acetate sheet (grid side down) over your drawing or photo and count the numbers of squares across and down that cover it.
- Take your sheet of paper, measure the top and divide into the same number of divisions as you had squares. Do the same for the height. Now connect the marks to produce your grid of squares, which will now automatically size-up your drawing or photo to the correct dimensions.
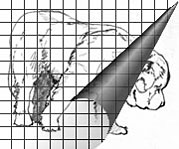
Lay your acetate sheet over the sketch.
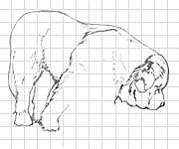
Lightly draw a similar grid on your paper then copy one square at a time.
Advanced Grid Method
stage 1
This is an advanced variation of the method shown above and has a few major advantages - no grid is drawn on the paper, guide-lines are easily erased, and immediate and accurate referral to the guide-lines is allowed even after they've been erased.- Measure your paper as above and calculate the size of the required squares but don't draw the grid. Instead, take a sheet of white card, the same size as your drawing, and on it draw your grid in black ink.
- To the top of this card tape a sheet of drafting paper (of the type used by architects or use any strong, semi-transparent paper) so it covers the grid.
- Place your acetate grid over your sketch or photo and copy it, square by square, onto the drafting paper. Be sure to keep your hand off the surface - rest it on a square of paper - as moisture from your hand will quickly cause drafting-paper to cockle and bend. You need to ensure that it remains flat.
stage 2
This is the method I used for almost all of the 52 head-studies I drew for my open edition print collection.
- Fix your drawing paper to your board in your usual manner then lay the drafting paper, containing your sized-up sketch, on top and carefully position it until you are satisfied.
- Tape the drafting paper in place along the top edge - preferably to the drawing paper so neither can move independently.
- Take a second piece of drafting paper (about 11" × 8" suited me) and thoroughly coat its rough side with 6B graphite. Don't be mean - you're making a graphite "carbon" paper.
stage 3
Using Graphite "Carbon" paper
To complete the advanced method, slip the carbon paper under your drafting paper and (with your hand again resting on a piece of card) re-draw over every line. I used a blunt darning needle in a clutch (or drafting) pencil holder for this but a hard-lead pencil will do the job. You can safely remove the carbon paper at any time and check your progress because the top line-drawing sheet (if you've securely taped it in place) will always accurately return to the same position. Indeed this method of working has much to commend it...
Using Graphite "Carbon" paper
- Guide-lines are not indented and can be removed completely with Blu-Tack/Wall-Putty or kneadable rubber. You can lay an area of flat tone over any erased area safe in the knowledge that no spurious lines will appear to haunt you!
- As the drafting paper is hinged at the top of your drawing it can be dropped down at any stage of the drawing to check for accuracy (especially useful if the removal of an error has erased your original guide-lines!). When you lose your way this is the "map" that will get you back on course.
And finally DON'T BE A SLAVE to your guide-lines... at best they provide accurate positioning, at the worst they are simply wrong - you draw what looks right, not what the photos say it should look like.
 Previous
TOP TIP
Blunt your pencil point - I rarely draw with a sharp point. Instead, when you've sharpened your pencil, hold it at an angle and circle its tip on a scrap of paper until you have worn a flat. This gives you every available "point" on the end of one pencil — use the flat to lightly build up tones — rotate the pencil and use the chisel-edge to draw sharp, crisp lines. Feel the "bite" as you work and you'll soon learn what each facet of the point can achieve.
Available here...
320gsm super-smooth Brilliant White paper
The ultimate versatile kneadable eraser
288 pages of drawing techniques and more...
Pencils, Starter Packs and accessories...
320gsm super-smooth Brilliant White paper
The ultimate versatile kneadable eraser
288 pages of drawing techniques and more...
Pencils, Starter Packs and accessories...
