Transcript
When you're telling a story you don't use someone else's words.
You use YOUR OWN words. So, if you use someone else's photos and COPY THEM, you're telling the photographer's story. THEIR story - not YOURS.
Of course, faithfully copying a reference photograph is an excellent way to learn because you have an image against which you can instantly judge your results. That's ideal if you are learning or practicing techniques. However, as you progress, you'll encounter two potentially serious problems.
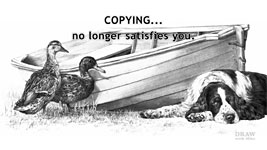
The fuel in the engine of an artist is self-expression. As your technical abilities improve, and your desire to make changes increases you'll find copying no longer satisfies you. You'll want to show your feelings towards the subject, to display its emotions, enhance its character, even alter its physical appearance. Or, perhaps, to amalgamate various aspects of a number of photographs into a single study - to say something. To tell YOUR story.
And... copying generates problems. It permits such things as camera distortion, awkwardly positioned elements, or a lack of information, to directly affect your drawing.
It's time to move on and use references as tools. To take from them what you need, to discard anything of no use, and to modify any elements that don't exactly fit your requirements, or possibly spark an idea.
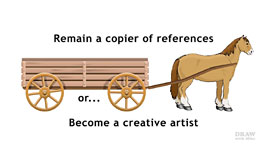
Some people find that prospect scary. Well, don't worry - that's very understandable. But you have a choice to make:
• to remain a producer of perfectly copied references, or
• to let go and embrace the freedom and enjoyment of being a creative artist. To tell YOUR story - using your own voice.
That's where you want to be, or perhaps you're already on your way, but first we'll step back and look at the problems associated with working directly from references. It's how many of us began.
For me, it was dogs. For others, it's human portraiture, which is a popular subject and dependant on references. So, let's project a studio photograph. The highlights are often burnt out; skin is flawless; and shadows often possess little detail. They are all excellent studio photographs but, for the artist, they can only provide an accurate outline, and positioning of the features. More importantly, you begin with no understanding of the subject; little knowledge of three-dimensional form and texture; and no PERSONAL conception of what you want to do with it.
Everything is presented as being perfect. Even the lighting is predetermined. And if you copy what you see... well, that's like learning a poem by rote - parrot-fashion.
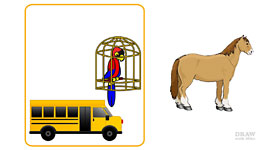
The parrot...
Said Hamlet to Ophelia, I'll draw a sketch of thee.
What kind of pencil shall I use? 2B or not 2B?
...knows all the words, but it has no idea of their meaning... or even that they ARE words.
When you use another person's words, or a photographer's studio portrait, your completed drawing might be technically perfect but, from an artistic point of view, it has nothing new to say. It merely repeats the vision of the photographer.
Take copying with a projector, or any other device. It's an invaluable time-saver.
You can quickly discover the outline and the shape and position of every feature.
Well, that's OK. They're just guidelines. It's WHAT YOU DO WITH THEM that matters.
Copying... It's quick. It's accurate. It's easy. But, the practice of copying a photograph directly onto the final drawing surface simply encourages the EXACT REPRODUCTION OF THE REFERENCE. A slavish copy. But to tell YOUR story you need to RECREATE YOUR SUBJECT. There's a world of difference between reproducing a photo and recreating its subject, whatever that subject might be.
If you use any device for creating your guidelines, you need to know what you're doing. Take, for example, these wonderfully crafted pencil portraits by the excellent
Armin Mersmann. Armin knows
exactly what his goals are before pencil touches paper. He understands every nuance of his subject, and the aspects of the character that he wants to emphasise. He OWNS it. It's HIS vision - no matter who took the reference photos.
You can best achieve that - and avoid all potential problems - by introducing an intermediate stage. Choose not to copy
reference to paper in favour of
reference to line and then
line to paper. It's essential that you copy in those stages - with that very special middle stage. That's where the MAGIC occurs and you take ownership of your subject.
The Magic Three-Step Method
I'll describe the process in terms of using the GRID to produce your guideline drawing - but it's equally applicable to any other method. First, if you're enlarging a photograph to a relatively large size - four, six, or even eight times its size, for example - you'll find it simpler and more manageable to enlarge it in two stages. Initially, you could use grids with 1cm and 2cm squares, to double the size, and then again from 2cm to 4 cm. Trying to enlarge a small photograph by too large a factor in one step will invite problems and inevitably generate inaccuracies. And, as you are about to learn, you should
always include that middle stage.
Gridding, or whatever method you use, essentially breaks down your "three-dimensional" reference into a featureless two-dimensional set of lines. It's here you inject the magic... your vision of what the subject will become. From this point onward the reference ceases to be influential and the image becomes yours!
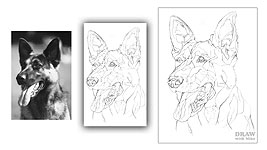
This is true of every drawing, even if it's a portrait, so it is essential that you size-up or copy in two stages with the special stage in between. Follow these three steps and, once you appreciate their importance, you'll raise your work to a new level in no time at all:
• First, reduce your reference photograph to a line drawing (and resized, if necessary)
• Insert your magic here...
• and then copy the now-customised line drawing to your drawing paper.
Boiled down to a simple line drawing, you can easily alter it to suit your requirements, build in emotion, fix potential visual problems, and even work out an entirely new lighting scheme. And during the middle (magic) stage you'll discover potential problems, work out what elements actually look like, and increase your understanding of your subject.
That middle stage presents you with at least five golden opportunities:
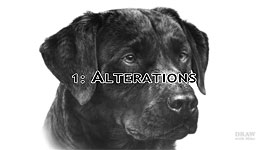
1 - ALTERATIONS
First, you can experiment and make alterations. Alterations that suit your intended use - safely - away from your drawing surface. If you're drawing a dog, for example, this is the ideal time to open or shut the mouth. To alter or enhance the expression - to perhaps turn this grumpy Labrador into a much happier one. Let's lift the brows a little and open up the eyes. And, lift the corner of the mouth into a hint of a grin. That's better.
Or maybe you need to modify an awkwardly long tongue. You can separately, and SAFELY, try different lengths until one can be comfortably substituted for the original tongue. If this was a landscape, you might choose to reshape a tree. Reposition a petal in a botanical drawing. Remove the TV aerial from an architectural study. Or the changes might be more minor but still as important. Such as tidying the dog's loose hairs; or introducing new ones to add vitality.
Often, essential detail is missing in a photograph. So, instead of just copying what you can see, or guessing what that dog's nose really looks like, do some research - online and offline - to find useful photographs, or even go and search books and other printed literature for suitable illustrations to help you rebuild that area. Use this stage to identify any problem areas and find solutions, and you'll ensure your final drawing stays sharp and clean.
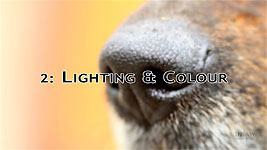
2 - LIGHTING AND COLOUR
As the first stage has reduced the reference to line, and removed all three-dimensional shading and lighting, you can easily apply your own. This is essential if you are combining a number of photographs to compose a scene.
Whether you're gridding, projecting, or even drawing by eye - this stage prevents the reference sources from dictating any content, emotion, or other characteristics.
With Psyche on guard in the doorway, we'll have Polly take centre stage. I know I'll be tucking her rear into the shade. But, when you're working with a flat line drawing, you can change the lighting to suit your needs. You know where the light source is, so use that to create the light and shade. And we'll place Percy, the bird-watcher, to the right. As you rebuild the subject, you can easily change colours too, so I'll lighten him to wheaten, using colouring from an unrelated dog's photo.
You might have made changes but, because you will be working from the reference sketch or photograph, you can revert to the original appearance at any time - but now it's purely your choice. You're not being controlled by the reference - YOU control IT.
As an example, I really like this pose. However, my drawing will be a commercial print - and I want to sell to the majority of owners - but most Shih Tzus are not this colour. They're THIS colour. So, combine them. As you draw, apply the colour of one to the form of the other. Problem solved!
Employ this middle MAGIC stage and your drawing will no longer be a copy of the photograph - it will be YOUR creation. And your understanding of your subject will have greatly increased.
And there are more reasons for adopting the three-step process too...
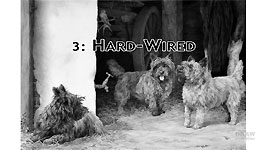
3 - THE "HARD WIRED" PROBLEM
This, the "hard wired" problem, is a very involved subject so I'll be brief. Your brain is hard-wired to store quickly-recognised features as a part of its defence mechanism.
If you see a large face with huge teeth, you need to recognise it instantly and get out of the way! All detail is discarded, only salient features are stored, and only those with hard edges, such as eyes and mouth - and teeth.
That's why children - who lack experience and rely on their stored images - usually omit the nose from drawings of people - it has no hard edges or clearly defined boundaries. Also, everything is stored as a "straight on" image - when speed of recognition is paramount, simple is best.
I discovered this drawing beneath wallpaper in our bedroom. A child's interpretation of an aircraft: The propeller is round and at the front. The wings are wing-shaped and correctly placed at each side. The pilot is inside the fuselage but can see out above it... it's all logically correct but each element is seen straight on because that best describes its shape.
Give yourself time to see and draw what you are looking at - and not what you think you can see.
Recognised shapes invoke the "I know all about that" response and the naming of parts. "That's a 'mouth' and I know what a mouth looks like". But that's the "straight on" stored-image mouth. It's not HER mouth. As an artist, it's that naming and recognition you have to overcome, and this stage gives you that opportunity. If it looks wrong...it probably is :) Now, that's better!
Give yourself time to detect and solve problems before drawing begins.
So, we know to avoid our built-in "hard-wired" system, but this MAGIC stage performs even more functions.
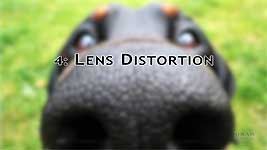
4 - LENS DISTORTION
If it's your custom to draw exact copies from photographic references then you are inviting constant problems. It's said a camera cannot lie, but OH can it bend the truth!
You'll be incorporating inherent faults, such as camera lens distortion, with or without burnt out highlights, or zoom-lens depth-of-field compression. This used a 50mm lens, much as we see naturally; and this used a 200mm zoom lens. Notice how the foreshortening has brought the background building much closer to you. That's not necessarily a fault - in fact, I used the 200mm foreshortened setting in Sutton Farm Sunday - but you do need to be aware that the distortion exists.
Lens distortion can take a number of forms. The two most common are BARREL DISTORTION, which we've already seen. It's where the centre appears to be closer to you. And vertical elements, towards the outer edges, bend inwards. And the other is PINCUSHION DISTORTION, where peripheral curves are concave, and vertical elements... Well, take a good look and identify what's wrong.
Because if you don't notice it and copy it through to your drawing, it might be a distraction and unsettle viewers of your work.
Using the three-step process allows you the freedom to observe your reference at leisure for distortion and other anomalies. In fact, this image displays two unfortunate faults: one is probably lens-based, and the other is a completely natural illusion. Neither of them is something you'd want to include in a drawing - but you WILL if you blindly copy the reference.
The lens distortion can be seen in this street lamp. It's leaning to the left. If you draw it like that, it will probably attract attention away from more important elements. So, it needs to be corrected and returned to a more vertical position.
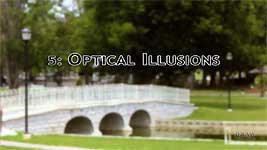
5 - OPTICAL ILLUSIONS
Drawing faithfully from any photographic reference might also introduce other problems, such as a variety of optical illusions.
Have you noticed the other, fairly major, fault yet? This one is even more unsettling than the leaning lamp! Half close yours eyes and look again. Your brain is perfectly capable of understanding amorphous green shapes as being parts of trees, but it can't make sense of the presence of straight lines. They just don't fit into the "this is a tree" recognition system. In fact, this fault is more likely to be seen as a crease in your drawing paper!
Even though it's formed by the shadows within the masses of leaves, the angled side of the bush behind the railings, and the edge of the arch... and it's entirely natural... that distracting line has to go!
Such problems are far more common than you might imagine and, if carried through to a drawing, will forever present a disturbing influence.
For example, When Ruth submitted this to me for critique, I thought it was a well-executed drawing... but it has two flaws. First, what happens here? The time to explore and solve that odd appearance is during the guideline stage, and NOT while you're drawing. Personally, I'd push it back into the shade, because the shadow created now pushes the ear away from the face and creates depth.
Also - there are two parallel straight lines running up the neck that could be a distraction. And the right-hand one connects to an edge going right up the head. They look unreal despite being natural. All it takes is a couple of stray locks that cut through those lines, and the problem ceases to exist.
Without that magic middle stage being present - these problems will not be noticed, and will inevitably migrate to your drawings.
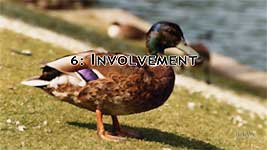
6: INVOLVEMENT
But WITH the stage intact you are looking
deeper and
deeper and
deeper into the reference. Your involvement is increasing all the time.
It gives you the opportunity to spot anything you don't understand. And you need to spot it NOW and not later while you're drawing. Because spotting it later is too late - Don't explore unknowns in your final drawing.
In this stage, you have ample time to work out what each element is, and how you might draw it; and for every problem you can find a solution.
If you're new to this concept, I suggest you approach the magic stage in small steps. How about beginning with simple research?
You could, for example, take an elderly gentleman's worn drinks coaster - that bears the only photo of his recently deceased and much-loved Basenji. The pose and markings are usable but there's no detail.
Research the breed and find suitable images. All dogs of the same breed, structurally, look just like each other, so use them to replace all the missing information as you carefully rebuild the dog. Safely worked out in that magic middle stage.
And it IS magic. It can have a profound effect on your work.
I drew this [Boxer] in 1979, when I was faithfully copying everything. The eyes are dead. The muzzle has been carved out of marble. The throat and chest are devoid of detail. I copied the reference and drew
only what I could see. Then, four years later, after I had discovered the magical middle stage, I drew a Boxer with attitude and life - and, of course, his friend Oscar the cat. I was no longer copying shapes and tonal values. Instead, I was exploring, and then drawing a living, breathing animal I understood.
Once you embrace that middle stage, you can begin to compose simple stories by combining pairs from separate photographs. And then progress to multiple elements in a setting. It doesn't matter if they're dogs, boats, trees in a landscape, or fruit in a bowl - the middle stage is where all the magic takes place.
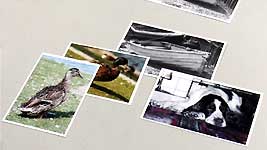
And when you have a collection of odds and ends you couldn't use in various projects, but you really wanted to draw... you can put them together to tell a story. Reduce them all to pure line. Rotate, flip, re-size. Make changes. Try out ideas and experiment - without causing
any damage to your final drawing surface.
And all you need is:
One boat
A Mallard duck
A drake to keep her company
And a dog, dozing by its fireside.
Wake it up. Open an eye. Let the story unfold... And you have "
Peekin' Duck".
The Journey Continues...
This is the final video in this series, so you're familiar now with all the Basic Techniques.
If you've enjoyed the adventure so far, I would love to have you continue the journey, by joining me in exploring the wonderful world of Creative Techniques.
Well... Thanks for watching and I'll see you there...
CREDITS:
Studio Portraits by Marek Bernat et al:
FreeImages.com
Basenji portraits:
Pixabay.com
Intrepid video Test Pilot: Mary Hollis
© copyright: Mike Sibley 2020