Transcript
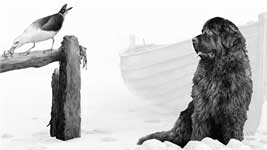
It's so tempting to draw the principle foreground subject first. That's understandable; it's often the most interesting to draw. And the most important. However, without the background being known, there's nothing to refer to, so the foreground involves a lot of guesswork. If, for example, you attempt to draw the dog first, how dark or light should it be? The dog is totally isolated. It doesn't "belong" to any environment. And it will control the values used in the background, which now has to be engineered to fit around it.
So, let's turn that around and isolate the background boat as a single element. Now you can concentrate on drawing the varnished wood, and the way if reflects light. And the foreground dog doesn't control the values. When the background is established first, the foreground elements can interact with their surroundings.
Establishing the background before the foreground gives greater control, because the background provides a reference - a "setting" in which the foreground can naturally exist. And, as you draw each foreground element, you can modify the shading to make sections stand out stronger, or lessen their presence.
DIVISION IN PRACTICE
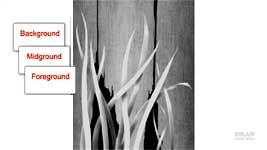
The foliage in front of this old wooden barn poses a potential problem - how to make the leaves stand out from the wall. So, what to draw first? Well, there are THREE natural divisions: The Background (there's no light in this barn, so the holes are pitch black), the Midground (the wooden boards of the wall, which are rotten near the base), and the Foreground (the leaves or blades of grass).
Guessing is not a good option. So, of the three divisions, which do you understand the most? Surely the background - it consists of nothing but very deep shade. And if you draw that first, you'll have the lightest and darkest values established, which helps you judge all the other values.
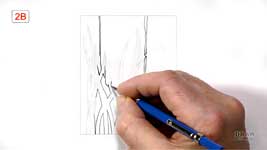
I'll walk you through this exercise, and explain each step. Begin by outlining the leaves where they cross over the holes behind. I'm using a 2B, because it draws dark lines with sharp edges. And I can use black lines because the holes are black. The outlines identify areas, such as these leaves, to be drawn later, and also to keep their edges sharp. There's another benefit too - you're protecting the virgin white of the areas you outlined. Areas you can't yet make decisions about. These outlines are not just guides for shading. They're the edges of real planks or living leaves. For example, the gaps between these old weathered boards are unlikely to be straight parallel lines. Years of swelling and shrinking in the weather will have distorted them. Or they might have been damaged by passing machinery or animals. In any case, these boards have been in place for a long time. Long enough for the damp to have rotted their lower ends.
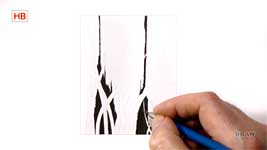
I can define those rotten edges now. And that's so much easier to do once the drawing has been divided. We've taken the drawing from leaves against old weathered wood - down to wood and its holes and gaps - then just the gaps and holes, leading to the holes - and the holes are bordered by the rotten ends. It's simple. All you have to think about while you draw the outlines is the shape of the rotten ends. It concentrates attention. And it encourages memories that generate a natural sense of reality.
The outlines have sharply defined the features of the edges and provided a narrow safety margin I can shade up to. Think about what you're drawing. There's no light inside this barn, so the holes in the wood must be black, and solid. If you leave any light patches in the shading, the result won't suggest the emptiness and depth of a natural hole. This is a 2B, so I'll burnish that with a layer of HB, to smooth it and remove any holes.
Before you begin drawing the wood - this is important:
know your lighting direction! Drawing an arrow in the margin as a reminder often helps. First, outline the leaves to isolate them. Keep in mind that the outlines must not be darker than you intend the wood to be. If you draw them too dark, they'll show through the shading instead of disappearing into it. Something else you should consider too: If you draw the wood too light, the highlights on the leaves will be weak, due to the diminished contrast. I've decided to use an overall mid to dark grey.
Where two leaves overlap, I suggest you don't draw the outline of either at the junction. You can decide which leaf is in front of another now, but I prefer to make that decision as I draw each leaf. With the outlining completed, it's time to begin work on the wood. Divide the work. There are three boards, so work on one at a time. Then divide that into top and bottom halves. Or even top, middle, and bottom. And then divide those into Line and Tone. The more you break it down, the easier it becomes.
Make use of the outline "safety margins". Place your pencil into them and draw AWAY from edges. That's much safer than attempting to stop at them. I find hatching with tapered strokes works best for shading planks of wood, because you can shade in seamless sections. The shading describes the direction of the wood grain. And if you vary the weight you apply to your pencil, you'll easily create lines that appear to be natural grain or splits. However, don't be too creative. If the wood is a secondary element, it shouldn't attract too much attention.
As I've said before: Division concentrates the mind. When you're only drawing wood - your concentration is on wood - you're "living" wood. You've created the ideal situation for recalling everything you know about it - such as damp wood being darker. Picture the scene in nature as you draw. Damp wood is darker than dry wood and the leaves would also shade the base, so you can confidently and gradually darken the wall towards the bottom. That adds bottom weight to the drawing, and increase the range of values you can use in that area. By working from background to foreground, you continuously build on what you know. By the time you reach the leaves, the background is already established, so you have full control over the way each leaf, at any point, stands out from the background, or merges into it. And if you work on only one leaf at a time, you'll reap the benefits of that control.
When all you have is a single, flat, white silhouette, you have the freedom to invent as you draw. You can plan, but I prefer the fun of spontaneity - letting each leaf interact with those around it as I draw. Leaves bend and twist. They reflect light from their curved surfaces. And they cast shadows on each other.
All you need to know is the position of the light source to work out where those shadows and highlights appear. And shadows can relay a lot of information very simply.
For example, you can use a cast shadow to help the eye follow an edge, to clearly see that one leaf is in front of another. And leaves have a thickness, so you can use a highlighted edge to pull a leaf forward of the background. As I said, when you have an empty silhouette, you can make whatever you want to out of it. The three versions here all share the same silhouette. And the version I'm creating here uses the same silhouette too. I have no idea what it's going to look like. But I'm confident I'll create something that looks realistic - because if it looks right to me, that must be because I recognise it as being naturally right.
I'm keeping the leaves simple for this demonstration - with no obvious texture, and concentrating on form. As you work your way along each leaf, ask yourself questions: If I push this leaf back, which other leaves will cast shade on it?
Is this leaf curving towards me or away? You can choose either - your "leaf" is just an outlined white space that you can mould into any form. Drawing just one leaf at a time means I can concentrate on it as though it's real. I can feel the surface under my pencil; see the way it bends, and where the light will hit it. Keep things simple and clear.
Also, don't be influenced by the tonal values that you see in Nature, or a reference. This is your drawing - your world - and you make the rules. I'm using the tonal values required for the drawing, not those in real life. This looks like grass; all the visual clues tell you it's grass, the single cast shadow tells you it has depth, and subtle shading tells you how each leaf twists or bends. The process used for that section is exactly what I'm doing now - background first and then one leaf at a time. The fact that all the leaves are much lighter than you'd expect in real life doesn't concern me at all - they do their job and that's all that counts. Draw the background first and foreground last and you should quickly appreciate the benefit of working this way. As you work forwards, each layer will be surrounded by its immediate background; you'll know the adjacent tonal values at any point and can both refer and react to them.
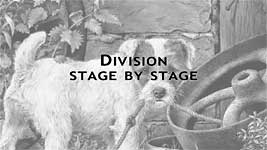
DIVISION STAGE BY STAGE
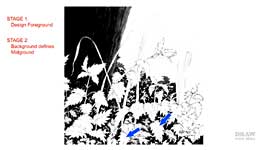
That was a carefully controlled composition with obvious layers. Later, I'll show you another with lots of room for spontaneity - something this background to foreground approach excels at. But first, this method - breaking everything down into its component parts - offers many benefits. When I mentioned "completing the background first", that is not necessarily to be taken as the full truth! By 'background' I'm referring to
that element's immediate surrounding area. In each area that I work in, I begin with the rearmost plane and work forwards.
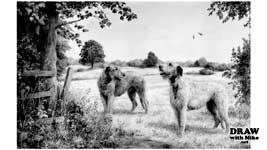
Let's return a section of this drawing back to its initial guideline state - and I'll show you how it was created in sections. I've already begun work on the bricks, and then stopped to work on the mortar. I'm drawing bricks, not leaves, so they are left as outlined silhouettes. And neither am I drawing hair, so I've stopped just short of the dog. My concentration is entirely on bricks, so I can build in all I know about them - their texture, features, and solidity. Now the bricks are complete I'll move on to the rusty wheel - and
only draw rust. Again, I can recall all I know about the surface, and stop short of anything that is not rust.
This next stage is the one I want to highlight for you, because I think it best illustrates the benefits of this division method. The dog needs its edges defined. And, as I create these edge hairs, all I have to think about is how they might naturally form. The shading looks like brick, but I'm
not drawing brick. I'm just using the same values - so my shading flows seamlessly into the bricks. This way of working simplifies everything. Even a complex job becomes easy when broken down into parts.
Now I'll repeat the same process for the old rope - creating all the fibres that stick out from its edges. And my shading matches the values I used for the rust.
Now let's tackle the dog - but I'll save you the agony of watching me draw for a few days... With those edge hairs already established, I have ends in place for any locks I create in the dog. I can make logical sense of those ends too, by engineering the locks to lead into them. And I'm not drawing rope - that's a separate job.
Time for a little relaxation and a change of texture. I'll complete the leaves above the dog. Again, I have full control over them, because they are surrounded by the environment in which they exist. Now let's complete the rope - one twist at a time. It's not a single drawing but, in this case, 19 separate, linked drawings. Why haven't I completed the lower end of the rope? Because I have a particular requirement for that element. The rope needs to stand out from the dog, but I don't want the viewer's eye to travel along it to the ground. So, I'll gradually diminish the rope's importance by merging it into the ground.
It's a simple task, now the dog exists, to build the rope, twist by twist, so it stands out from the leg. I have that same level of control as it passes in front of the darker rear leg. And then I can gradually reduce the contrast and darken the rope until it's almost impossible to tell rope from ground at its lower end. That should ensure focus remains on the cheeky pup and her story. And it was only possible because the background already existed for the rope to be pushed into. When deciding which element to draw first, there's almost always a logical order to follow.
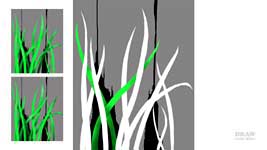
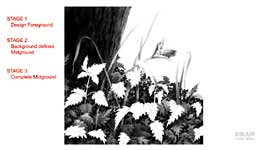
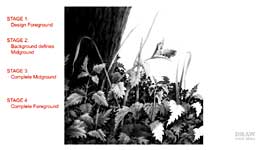
DIVISION AND FREEDOM
And, finally, the way I often use this background to foreground method, because it offers ample scope for invention and spontaneity. I design the foreground, use its outlines to isolate it, and then invent the midground and background as I draw. I believe drawing should be fun - enjoyable - not an exercise in rigidly following a pre-determined plan. So, I build as much freedom to invent into my work as I can. Having completed the section of tree, and then chosen an area to work in, I establish a dense black to use as a tonal reference. This is as far back as the eye can see - the absolute background where no light is present. Then I use the background to define the midground content - as silhouettes. But there are no rules. If I feel the need to outline a midground leaf or two, I will. Just think "What might I see in there if this was real life?" And I hatch it; to remind myself it's a midground and not foreground leaf.
I'm inventing overlapping parts of leaf-like shapes to fill the area behind the foreground leaves. Any large black areas - so large you'd expect to see something in there - are broken up with small, unrecognisable, organic shapes, which is entirely natural. I'm concentrating on a natural design; not shading the midground, or confusing my mind by homing in on particular leaves. But Nothing is carved in stone: if I feel the need, I can alter anything at any time. For example, any new leaf you see, that isn't hatched, is destined to be a foreground leaf, because I felt one should be there. The concept is one I favour - fooling the viewer's brain into seeing far more than is actually present. The sharp foreground elements will attract the eye. They provide a focus that fools the brain into accepting the surrounding area as foliage not requiring further understanding.
It's time to begin work on the midground. The partial leaves and stalks are all in place - and they are all in the shade of the foreground, so the tones need to be dark, with no bright highlights. I'll push many of the leaves and shapes into the shadows while adding some form to them. Imagine pushing your pencil into the weeds as you draw and picture them as being real. The only inclusion of detail is the occasional leaf's central rib and a suggestion of three-dimensional form. Over-detailing the midground leaves can lead to them becoming a distraction. And if you're not sure how shady or bright something should be, work around it until you are sure. This method gives that level of control.
Occasionally, consider placing a leaf on an inclined plane. By pushing one end back into the darkness, and allowing the other to curl forwards into the light, you connect the different planes. It's a bridge that helps the viewer's eye to travel smoothly between the layers.
Finally, the "hard work" layer. This is the vital layer. All edges must be super-sharp, so the leaves spring forward of those behind. And time spent on detail and form is time well spent. These foreground leaves hold the visual clues to everything behind them. Notice how your eye is attracted to them, and how your brain readily accepts the less-distinct shapes as belonging to the same plants.
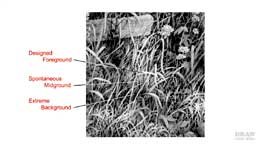
Here's the exact same technique used in an enlarged section of a finished drawing. The black, extreme background first, used to create the spontaneous midground - all of it "behind" the isolated, outlined, and previously designed foreground. And the foreground tells us all we need to know about the plant to accept the deeper layers without investigation.
Use division - in any of its forms - whenever you can. It allows you to concentrate on one element of the drawing at a time - to let your mind immerse itself in exploring what it recognises as being natural - and greatly simplifies the complexity of any drawing. Break it down - and anything becomes possible.
© copyright: Mike Sibley 2019