
GRAPHITE INDENTING
The indented lines form fine highlights within areas of dark shading, which is particularly useful when drawing hair.
This in-depth video explains, and demonstrates, how and why Graphite Indenting works, with practical advice on its use.
WHAT YOU GET...
Introduction
Mike introduces you to the concept of Graphite Indenting, and using hard grades to "resist" soft grades - which he calls Graphite Resist. They combine to create sharp, thin grey lines within darker shading.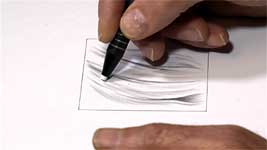
The problems with erasing
Erasing, as Mike explains, creates white lines, or hairs, with soft edges. And returning graphite shading to the original, pristine white of your paper is not guaranteed.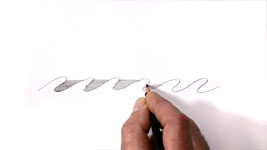
The paper's tooth
The paper's tooth is often flattened by erasing and, combined with graphite/clay filled pits, soft graphite has problems adhering. This is equally true of perfect, pristine tooth, as Mike explains. But you can make positive use of this "problem" and turn it into an advantage.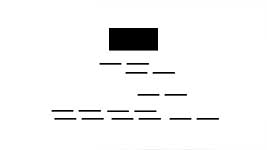
The structure of graphite
The crystalline structure of graphite determines how it performs. An animation describes the structure, and explains why conventional erasing fails to be fully effective.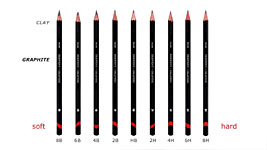
Graphite pencil grades
Graphite Indenting depends on knowledge of the paper's tooth, and the different graphite/clay mixes used in the various grades of pencil. Mike explains in an easy to understand way.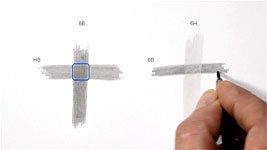
Hard over Soft...
Hard grade over soft, and a soft grade over hard. Mike demonstrates and explains why one is possible, and has advantages, but the other can encounter problems.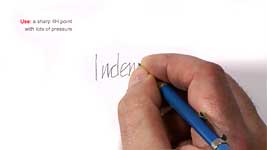
Exercise #1
Try this: write a word with a hard grade. Then shade heavily over the word with a soft grade. Mike guides you along the way.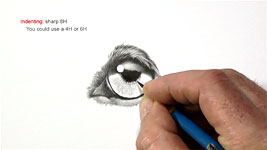
Exercise #2
Mike demonstrates his most common use of graphite indenting - creating the radial flecks and striations in an eye. These are permanent, so subsequent erasing and re-shading can take place without the striations being affected.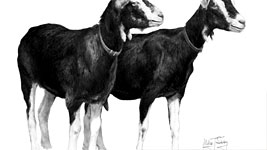
Creating highlights
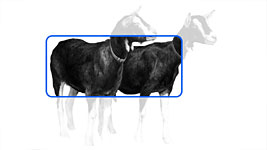
Mike explains how he used Graphite Indenting to, necessarily, speed up the drawing of two goats - destined to be a present for his wife Jenny.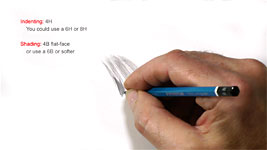
Demonstration...
A practical, step-by-step, demonstration of creating bright highlights in dark hair using graphite indenting.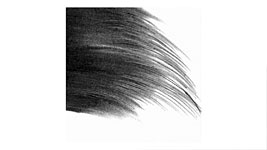
Step by step
Applying the technique of graphite indenting, step-by-step, in a close-up view. And advice on using it to create clearly defined highlights in hair.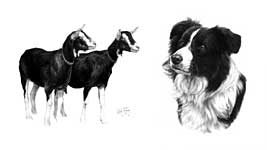

I think the brain can only absorb so much when a concept is first introduced. Personally, I find revisiting these videos after the courses incredibly beneficial for cementing previously-introduced concepts that I didn't quite grasp the first time around. Learning is a very iterative process: the concept introduction enables the student to gain initial practical experience, and then subsequently, having that practical experience opens the brain for some ah-ha moments and greater understanding that wouldn't have been possible in the initial go-round. Great resource, thank you!
Transcript
To fully understand the mechanics, we need to know about the paper's surface - that's the tooth that we draw on, the properties of graphite, and how the various pencil grades perform. And to understand how erasing can alter the surface of our paper. If there’s one technique you need to avoid, it’s using erasers to create highlights and white hairs or lines. In addition to problems with smudging, incomplete removal, and soft edges, erasing graphite from paper often flattens its tooth. It's the pits and crests of the paper's tooth that scrape the graphite off the tip of your lead and holds on to it.So, when the tooth is flattened the ability of the paper to accept further applications of graphite becomes diminished. And the graphite or clay that is left buried in the tooth can prevent additional layers of graphite from adhering to the paper. However, as you are about to learn, we can make positive use of these apparent problems.
But first, let's go back to basics and take a look at the properties of graphite and how it behaves. Graphite - the "lead" in a pencil - is a dense form of carbon and it's made up of flat plates. That's why it's shiny, unlike the irregular grains of charcoal. Conventional erasers often don't remove graphite well – they quickly pick up a layer of plates, which then slide over the plates remaining on the paper. Those smooth slippery plates are why graphite makes an excellent dry lubricant for machinery.
Graphite pencils, of course, come in many different grades - from very soft to super hard. 8B to 8H in this case. Those grades are created by mixing the graphite with various amounts of very fine clay – the more clay the harder the grade. Plates of graphite - especially in minimal-clay soft grades - might not completely enter the tooth of the paper. However, the fine clay content of the harder grades can very quickly and completely fill the tooth.
All those properties - Flat Plates, Fine Clay, the Paper's Tooth - can combine within a drawing to cause some strange results. For example, soft grades (such as a 6B or even 10B) rarely fill the tooth, because their larger graphite grains tend to sit on the top of the paper. That's why you can layer a harder grade - such as this HB - over them. It can work in between the soft grains and find the tooth beneath. The hard grade will break up the soft grade, push it deeper, and remove imperfections. And, in removing those holes and gaps, it will increase the perceived darkness of the soft grade too. Conversely, a hard grade - this is a 6H - will quickly fill the tooth with clay. With the tooth of your paper now filled, a soft grade will skate over the top and fail to layer properly, or not at all. However, we can use that “problem” to our advantage.
Graphite Indenting doesn't require a stylus. Instead, a sharp, hard grade pencil is used to create the narrow, clay-filled indents. The clay acts like the “resist” in etching where acid can't eat into the metal plate. The "weird" thing is that your initial dark hard grade marks will eventually appear as highlights in the darker top layer. Two things occur: The hard grade indents the paper with a thin groove and deposits fine clay and graphite within it, so the softer grade has nothing to cling to. Not just an indent, but an indent containing resist. Double insurance! I keep both 6H and 8H for the sole purpose of providing the resist and indenting the lines. And once indented, as I'll show you later, they're permanent and I can ignore them as I work over them.
Try this: Use a sharpened 4H pencil and a lot of pressure to write a word. Now you have the word indented with thin grey lines, apply dark shading over your paper with a 4B or 6B. From out of the dark, your light grey word magically appears. Then shade with more pressure to test the effectiveness of your indenting. See if it breaks down under pressure.
Now try a more practical test. At this point I must tell you that I rarely use this Graphite Indenting technique, except for one specific task – indenting the radial flecks and striations in the iris of an eye. They appear when I shade the eyeball and I can make as many value adjustments as I need; confident that those flecks will never disappear. I'm indenting the striations in this iris with a sharp 8H pencil. You could use 4H or 6H instead. I'm using quite a lot of pressure - and NOT drawing "wheel spokes". Try to keep the marks varied in length, but still radiating from a central point. This is a dog's eye, but this technique is equally useful for any type of eye.
Now the shading is applied with a soft pencil. I'm using the flat face of a 2B sharpened to a chisel point. You might find a 4B or 6B works better, but 2B is the softest grade I use. I find anything softer too grainy. As you can see, the flecks in the iris are magically appearing as I shade. Then I use my trusty Blu-Tack to adjust the values and create the secondary highlight - safe in the knowledge that the indents will always be there - no matter how many times I restore the shading and erase again.
Although I now only use this technique for indenting the radial flecks in an iris, I have used it for rendering highlights in dark or black hair or fur. It can be very effective but, in my experience, success is not guaranteed. Some years ago I drew our goats, Bramble and Minty, for my wife as a present. I could only work on it while she was out shopping so, to speed up the drawing process, I used the graphite resist method. I first laid down the highlights in the coats by indenting with a 4H pencil. Then I shaded heavily on top with a 6B pencil, which couldn't stick to the 4H. Hence, the graphite resist method left the visible highlights. My use of Graphite Indenting goes back a long way. This is from 40 years ago - when I was still discovering three-dimensional form and beginning to think "maybe it should look hairy too". Wherever you see light lines within dark areas, such as above the eye or on the cheek bone, that's graphite indenting. Was it successful? Partially - maybe? But then I learned to use the highlights and shadows within the hair itself to describe the three-dimensional form - which is how we see it naturally.
With that in mind, I used the same technique again, some years later, to create the cheek and neck highlights in this Border Collie. The white whiskers were produced with the use of my indenting tool - Direct Indenting - but the less obvious highlighted detail was first drawn in with a 4H in the knowledge that the 6B would have insufficient tooth remaining to adhere. The 6B was then applied in the direction of the hair, with sufficient force to embed grains into the virgin tooth. No allowances being made for the previously drawn areas, which my pencil just skated over. A final burnish with 2B consolidated and smoothed the grains of the 6B without altering the appearance of the 4H areas, other than to fill in between the lines where I'd left gaps to denote shadows.
And here, step-by-step, is how you can use that technique. STEP 1: I'm drawing these curved lines with a 4H pencil - you can use any hard grade but the harder the better. And I'm using sufficient pressure to lightly indent the paper. You need to keep the 'negative' factor in mind when you apply the hard grade. Strange though it might at first seem, you are drawing highlights, not hairs or shadows. Shadows are produced by NOT drawing line - the negative spaces. These deliberate, virgin spaces left either side of the lines are destined to become dark hair and intense shadows. The closely spaced lines I'm drawing will be seen as a mass of highlights, which contrast with, and emphasise, the shadows between them. Also - this is important - the ends of all the lines are tapered so they create the illusion of highlights in the hair. NEVER leave visible joins or blunt-ends in strands of hair or fur! ALWAYS taper the ends of all your lines.
STEP 2: I'm using the flat face of a 4B chisel point to shade in the same direction as I did with the hard grade. Shading along stylus-indented lines often causes them to partially fill with graphite, but graphite-indented lines are sufficiently narrow for that not to occur. And, in any case, the resist will - well, "resist" it.
STEP 3: Now the shading with the soft grade is complete, the highlights have mysteriously appeared. And, because every end of every line, in both the hard and soft layers, was tapered, there are no visible joins in the shading. Let's look at those steps again: Use a hard grade pencil to draw what will become highlights. Shade with the flat face of a soft grade - in the direction of growth if you're drawing hair. With the shading complete you can fine-tune the result. Here some sections benefited from darker shading with a 2B to increase the contrast, so the indents now appear to be highlighted hairs running through dark shading.
Of course, this is enlarged, so let's take it back to its natural size... Perfect curving highlights on a glossy black coat! Until you've tried this technique for yourself it's difficult to believe these lines were originally the darkest, but it really is just an optical illusion.
So, you have the perfect excuse to draw the “wrong” way round - dark lines that become highlights - and with a positive outcome. However, Graphite Indenting, although it's a very useful tool, is one to be treated with caution. It is not, in my experience, completely reliable. It is paper-dependant, and liable to occasional failure. But it might work very well for you. It's certainly worth experimenting with - and you do need to experiment before trying it in an actual drawing. But if it works for you, it can produce really useful results.