Tips & Techniques
Drawing HAIR - an introduction
Because I draw dogs I receive numerous requests about how to draw hair. This seemingly simple exercise is in fact an almost impossible task. Not only do artists styles differ widely but so to do their aims. However I can at least present you with my way of drawing hair; the techniques that suit my style and ambitions...and, even then, I expect to have left much unsaid........
Seeing is believing... but don't believe everything you see...
Which is a short way of saying you can draw hair that is easily believable but the technique may suggest more detail than is actually present. There are a number of "levels" at which you can tackle your drawing — you might, for example....
- Choose to concentrate on the three-dimensional underlying form.
- Partially overlay the solid shading of form with a resemblance of hair and texture.
- Use the hair itself and its lighting to define the underlying form.
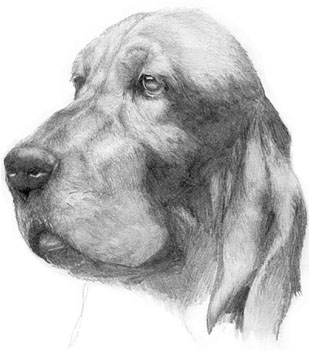
A delightful drawing of a Hound by Karen Gillies. Tonal shaping is used to define the form of the body, which concentrates the viewer's attention on the eyes. The artist has awarded little importance to hair detail.
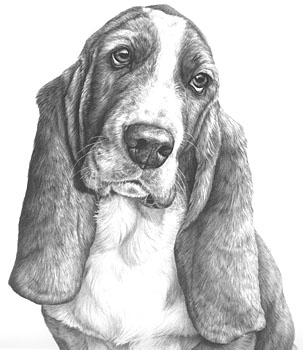
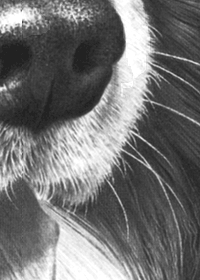
This Basset Hound drawing of mine shows the use of hair as the sole means of expressing the three-dimensional form of the body. Here the white of the eye has been carefully preserved to attract attention in that direction.
In drawing the Basset (above right) I have used local shading - calculating the light reflection of each hair, or lock of hairs, as it is drawn and applying the required tones. No global shading exists but all local shading is adjusted with reference to its position within the whole subject. In this case priority has been given to the outward appearance - three-dimensional form is described only by the hair, its texture and surface highlighting.
It's not all black and white...
If everything "black" was really black and everything "white" was pure white we would see nothing except flat, featureless shapes with sharp outlines. But nothing in life is so simple - in reality reflections and absorbance of light play a full part in what we see. It's the highlights and shadows of a Black Labrador's glossy coat that tell us what shape the dog is - the underlying structure is never overtly seen. The hair, only the hair, defines its three-dimensional form. The same is true of a white Poodle except that the emphasis is reversed - the shadows play a greater part than the highlights. But there is also one other aspect that is as true for each in the drawing process......A PENCIL MARK IS NOT A HAIR
I cannot stress this too much or too often — Pencils do not draw hairs. Pencil marks only define the position and shape of hairs. Well, that may be a little too simplistic - there will be occasions when a dark hair overlays a patch of white hair and requires a positive pencil stroke. And pencils certainly add the required tonal values to hairs. But in general use a pencil line does not represent a hair — it forms the boundary between hairs.Negative and Positive...
Drawing hair is about positive and negative drawing (see introduction to negative drawing) and each has to be understood in its own right before you can effortlessly combine the two and reproduce hair with a sense of reality.As I stated above, we see black hairs because of their highlights; white hairs are outlined by their shadows. In both cases the hairs are visible because of their "negative" properties. In practice you create not the hair but the shadow or highlight. For black hair the highlight will range from bright, white through a series of darkening greys but not, however, to black - the darkest tones available must be reserved for the positive shadows that define the edges of black hairs not for hairs themselves.
This is the key to negative drawing; the technique that you must learn - as you work, focus your full attention not on the actual lines you are drawing but on the spaces in between them. In common with watercolour painting, the only white available to the Graphite Artist is the white of the paper. To produce a white line you must therefore define that line by outlining it in a darker tone. The line you are drawing has no importance in itself. It is the space between the lines that is paramount.

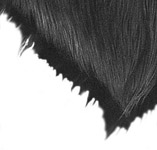
Are these black lines on white or white on black?
If these are black lines drawn on white paper then
the drawn lines are positive marks.
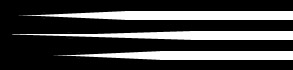
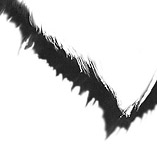
White lines on black? They appear to be so because
the black defines their boundaries. The black is drawn solely to create the white. This is negative drawing.
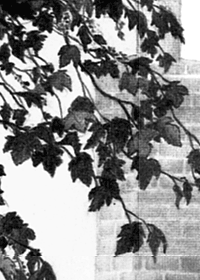
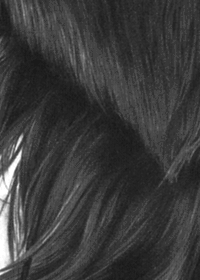
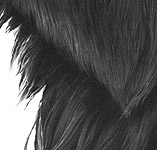
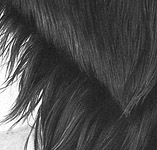
The foliage is an example of positive drawing. The pencil lines provide the dominant marks.
An example of negative drawing. The pencil lines serve only to define the dominant white hairs.
A combination — The positive-drawn shadow is extended both up and down into the adjoining negative-drawn areas.
How is this achieved?
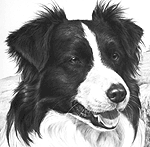 Wherever possible, I work from dark into light. From a purely practical point of view it is far easier to graft later drawing onto a dark area of tone. This enables me to use it as a break - to draw away in one direction then to return and continue in the opposite direction. The ear shown above-right (and the one I am about to demonstrate with) is the left-hand ear of this beautiful Border Collie. I would work this area in four distinct stages....
 Stage 1: Having found my black shadow area from which to work, the shadow is roughly established and the top edge carefully drawn up into the area above to define the lighter hairs. Remember, I'm drawing the shadows between the hairs here. The white "hairs" are left white until the next stage.
 Stage 2: Working from dark to light, the ear flap is drawn back down into the shadow. This is negative drawing as I'm drawing the shadows between the hairs and not the hairs themselves. Once the hairs are defined, tone is applied, and the lighting continually adjusted, to describe their correct three-dimensional shaping. (see "Drawing Grass").
 Stage 3: New drawing is grafted onto the dark shadow as it is extended down into the area below. If some of the light hairs need to go back up into the shadow this can be achieved with Blu-Tack or kneadable eraser - a line of graphite removed from the shadow is redefined and blended into the light line below.
 Stage 4: The negative-drawn highlights are closed by bringing the two outside boundary lines together into one. These now form one positive line that is drawn to a point to complete the end of each hair.
Conclusion...
Working one small area at a time will make your overall project far easier to handle both mentally and physically and will keep you firmly in control. Don't be tempted to work on the whole drawing at once and nor should you attempt to fill whole areas with tone. Well, Yes - I know your drawing will look more complete far more quickly... and you may feel that it's helping you establish form but beware - the bright highlights you may later wish to create will no longer be achievable, resulting in a distinct loss of life and tonal depth.Decide on the light direction, consider the position of every hair you define and then apply the illumination accordingly. Defining your hairs and then calculating and adding specific local tone will give them an enhanced reality — don't use global toning and hope it will work locally.
TOP TIP
When taking photos as source material always use colour film. You'll need colour to follow detail through areas of shadow and you'll need to understand the differences between areas of similar tone. But above all - colour film won't dictate your choice of tones - you stay in control.
Available here...

250gsm super-smooth Brilliant White paper
The ultimate versatile kneadable eraser
288 pages of drawing techniques and more...

Pencils, Starter Packs and accessories...
250gsm super-smooth Brilliant White paper
The ultimate versatile kneadable eraser
288 pages of drawing techniques and more...
Pencils, Starter Packs and accessories...
