Transcript
In Erasing Basics and Erasing Selectively I mentioned that pencils and erasers are complimentary tools. Erasers are
not just tools for removing mistakes - they are equal partners with your pencils. One applies graphite, from gently to heavily, and the other adjusts its values, or even removes it completely. Two tools that perfectly compliment each other.
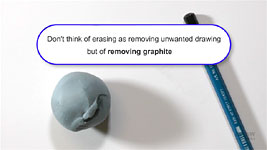
Erasers do, of course, remove mistakes - but erasing is actually an integral part of the drawing process - not just a means of correcting errors. Don't think of erasing as removing unwanted drawing, but of
removing graphite. This concept extends eraser usage to the removal of deliberately over-applied graphite, and the adjusting of tonal values.
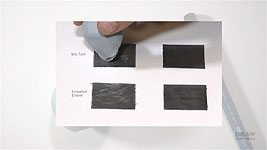
I must stress that not all erasers will perform in the required manner. Hard, or even soft, plastic art erasers cannot cleanly remove half a layer of graphite. And they might damage the tooth of your paper. They will remove some graphite, but smear the rest and push some deeper into your paper. What we need is a slightly sticky eraser that will lift graphite from the tooth of the paper with just a touch - and leave an erased area that can be safely drawn onto again.
Fortunately, Blu-Tack perfectly fills that description, as do kneaded erasers, although they are perhaps not quite as effective. Blu-Tack is the original poster putty, and
available from my website if you have problems sourcing it. Or you can try the Blu-Tack look-alikes, such as Tak'N'Stik, U'Tac, Blue-Stik, or UHU's White Tack. However, I've tested many brands over the years and none of them are quite as efficient at removing graphite. Or, of course, you can use a kneaded eraser - it might work for you as well as Blu-Tack does for me.
ERASING TO LIGHTEN VALUES
Erasing Basics and Erasing Selectively explored the bulk removal of graphite. Now we'll look at partial removal - the adjusting and fine-tuning of values. Previously I advised you to never drag Blu-Tack. However, it's a technique definitely worth exploring - and one I use constantly to adjust values.
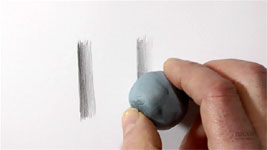
Try this exercise - and try it with different erasers, so you can compare them. Draw two identical shapes, or just fill a couple of narrow boxes with HB. As you erase one, the other will show you what effect your erasing is having. Pull out a finger of Blu-Tack from the ball and then flatten its underside. I either pinch it between my fingertips or press it gently onto my drawing board.
To use this technique, very gently stroke the Blu-Tack over the area you want to lighten. Stroke it down and back up - like stroking a cat. Now keep stroking and you'll very slowly fade one out, as though it's moving back into the distance. Because the finger will become dirtier with removed graphite, it will remove progressively less with each stroke, which gives you infinite control. Most importantly, Blu-Tack
will not put that graphite back onto your paper. If you want to speed up the erasing process, pull out a clean finger and continue. I use this technique all the time. So, don't think of your kneaded eraser or Blu-Tack as an eraser, but as
an adjuster of values.
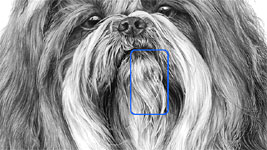
This is an example of why the technique is so powerful in use. When you want to draw an area with very light detail, you can draw it a little darker, so you can see it properly and keep control of it. Then gently fade it to achieve the value you actually required. You can obtain really delicate shading that way - especially highlighted areas in an animal with white hair, such as this Shih Tzu.
Again, this section of "What?" shows you the affects stroked Blu-Tack can achieve. This area was drawn darker, so I could keep control of it. Then it was progressively lightened until it looked the way I wanted it to. Producing believable, very light detail with this method is much easier than trying to achieve it with just a pencil. Of course, it's possible to over-lighten it, but then I simply use my pencil to darken it before adjusting it again.
SPOT AND CREATIVE ERASING
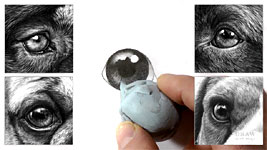
You can also use this technique on very small areas. To brighten an already established highlight, for example. Where a hard edge won't matter, a simple touch with Blu-Tack will restore it to pristine white. I also use Blu-Tack to create the secondary highlight in eyes. To gently adjust the mid-tones, stroke them with Blu-Tack. As I mentioned, if I lighten it too much, or don't like the result, I simply darken it before erasing again. Usually, I repeat that process a few times until it suddenly possesses the reality I'm trying to achieve. The striking benefit of this technique, apart from giving great results, is that
the detail is not harmed and all sharp edges remain sharp.
ERASING TO ADJUST VALUES
Now let's try a practical example. Have a go at this yourself, because nothing teaches as well as personal experience. I'll draw and shade a rural scene, and then use my eraser to "move" some trees further back in the scene to create more depth. So, begin by drawing a simple scene that involves recession. Include at least three trees (or similar objects, such as fence posts) that recede into the distance. For the purpose of this exercise, use the same values for all the trees, regardless of how far back they are.
While I prepare this, I have a few pieces of Blu-Tack erasing advice for you:
- Use a light touch: Always use a light touch with Blu-Tack. It removes graphite because it's slightly sticky and never needs to be pressed into the surface.
- Use two balls: I keep two balls of Blu-Tack available (I always ball up full sheets). I keep one in my hand to keep it warm, and the other on my drawing board, so it stays cooler and maintains an edge or point for longer. The warm ball is more malleable, and slightly softer and stickier. That stickiness is important - it will pick up graphite right out of the tooth causing no damage at all to your paper, so an erased area can safely be drawn onto again.
- Don't drop or tap: Do not place, drop, or tap Blu-Tack onto the graphite. You might create hard edges that can be difficult to completely remove.
- Stroke it: Sweep it down and off your paper, so you feather both ends.
- Older is better: New Blu-Tack is rather stiff, and it might disappoint you. Keep it in your spare hand to warm it up, and keep squeezing or stretching it from time to time. When it's warmer it becomes softer and stickier, so it picks up more graphite. And the older and dirtier it becomes, the easier it is to mould into shape.
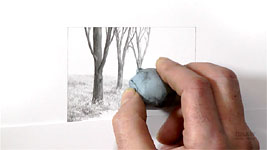
This exercise is built around a common problem. I have three trees and the two furthest trees don't recede into the distance as much as I would like. Because we graphite artists don't have colour available we can't add blue to suggest distance - we often have to exaggerate recession. To make these trees appear to be further away, I need to enhance the atmospheric perspective. They need to be lightened, and the detail and contrast reduced.
Pull out a finger of Blu-Tack and flatten the underside. Now
very lightly stroke the Blu-Tack over the midground trees and grass until they begin to fade back into the distance - or into the mist, if you see it that way. If you only have a kneaded eraser, do the same. It will work, but probably not as effectively. As you work, constantly refer to the dark values of the foreground tree to gauge how light the trees are becoming. If you push anything too far back, simply pick up your pencil and bring it forwards again. As long as you use the Blu-Tack lightly, you should preserve the detail, so darkening it again doesn't involve any extra thought or creativity. Now repeat the operation on the background tree. As you can see, the overall values of each tree and its surrounding grass become progressively lighter as it moves further back into distant space. You've exaggerated depth but your story is crystal clear.
Of course, in practical use, you would
draw the midground and background trees progressively lighter, but this technique allows infinite adjustments to be made, as you can see here in the right-hand foliage of "Connemara Encounter". I use this technique for creating secondary highlights in eyes, recession in expansive scenes; adjusting the subtle values in skin tones, and fine-tuning values in general; and a host of other uses too.
It's become an integral part of the way I work, because it offers a subtlety of result that drawing alone cannot always achieve. And it introduces a degree of spontaneity, which encourages "happy accidents" that can create something extraordinary - textures and forms that I hadn't consciously considered.
Just remember, Blu-Tack (or your kneaded eraser) is an
adjuster and not just a remover of errors. It's the opposite of your pencil and the two work together in perfect harmony.
© copyright: Mike Sibley 2019