Transcript
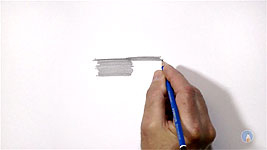
When you shade large areas, the shading will inevitably need to be carried out in sections, and that presents problems. For example, if all your lines just stop there will be a visible hard edge down your paper. And adjacent shading will overlap that edge and create a double layer of graphite, rendering it even more noticeable. The solution is
tapered lines.
First, varying the length of the lines helps to prevent a visible edge, but to banish it completely, taper - feather - the ends of all your lines so they fade to white. You do that by gently lifting your pencil clear at the end of each line. Adjacent shading now joins seamlessly. Tapered lines are invaluable for seamless shading.
Shading without them creates unnatural edges and ugly dark marks. But when tapered lines are used, the result is splendid smooth shading and an enhanced sense of reality.
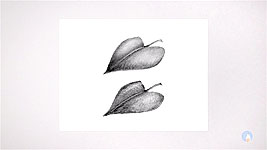
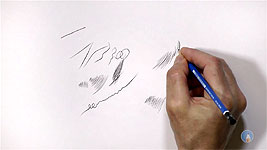
As I mentioned, often some sections of a drawing are too expansive to shade in a single operation. This sky, for example. By tapering the lines and staggering the ends, I can shade in sections that seamlessly flow into each other. This sky was also lightly blended to remove all traces of line. But within the tree and the old fence rails and posts, line played a major part. All those were drawn in sections too. However, here values were allowed to differ between sections to suggest decay and age.
Practice tapered lines. You
need to. I could argue that every line you draw should be tapered - and at both ends. It's fundamentally important to drawing realistically. You need to practice until drawing tapered lines becomes second-nature. There's nothing quick or uncontrolled about drawing tapered lines. It's not a quick flick. It's a very deliberate movement with a rhythm. Treat the line as being in three parts. I think of it as being like landing a light aircraft on the runway - taxiing along it - and then smoothly taking off again.
Let's take those three steps. STEP 1: Don't just place your pencil on your paper - land the aircraft. Swing your pencil down to form the taper, which only needs to be very short. STEP 2: Taxi along the runway. Draw your line just as you've always done. Take your time. There's no need to hurry. STEP 3: Take off again. As you approach the end of the line, gradually decrease the pressure, or weight, until your pencil leaves the paper.
Practice tapering in as many ways as you can. This is something to be learned. That is, you have to teach your brain what you want your hand to do. Magicians know all about this. We call it sleight-of-hand, they call it Muscle Memory, because they know only constant practice will perfect the movement.
When you're reasonably comfortable with the start and end tapers, draw straight lines, curbed lines, long and short lines - every line you can think of. Don't make life difficult. Start by tapering only the beginning of the lines, and when you're happy with that, taper only the ends. Now try both ends. And then teach yourself to do it in every direction. I cannot stress how important this skill is. It really is fundamental to good drawing. For example, it only needs one blunt end in hair to damage the overall sense of reality. Unless it's been cut, no hair ever just stops dead. And no gap between hairs ever begins or finishes with a square end.
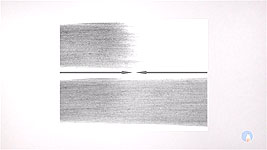
Now let's put it into practice. Remember the blunt-ends/double-graphite problem? Let's try that again but using tapered lines. The basic technique is this: a line with a taper, and a line coming back to meet it so its end taper overlaps the other one's taper.
Now let's try an area. To keep it simple I'll just taper one end. I'll stagger the lengths too, so there's no obvious line down the paper. Now shade back to overlap tapers over tapers. The result: seamless shading. You've still drawn graphite over graphite, but
a taper over a taper is a single solid line.
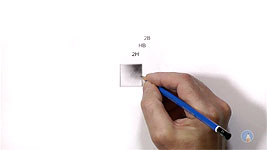
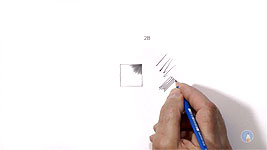
Now let's take that stage further and use multiple grade - more of an actual drawing situation. And this exercise will show you how successful your tapering is - or isn't! Draw a box about 1 inch (2.5cm) square. There are four stages. STAGE 1: Begin with a 2B with some weight from the top right-hand corner, or top left if you're left-handed. Don't draw fast and lose control. There's never any need for speed. Now stop and look for errors. The three most common are:
- Blunt ends
- Hooked ends. These occur when you try to return to the beginning without finishing the taper. Don't work too quickly!
- Zigzag shading. This is worse than blunt ends, because you now have blunt ends with double graphite.
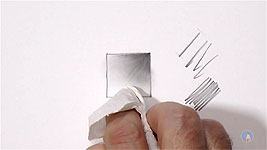
STAGE 2: Shade half way across to the bottom left, again from the top right, and use an HB so you burnish the 2B. That will smooth it and remove any white holes. STAGE 3: Now shade three-quarters across to the bottom left corner, again from the top right corner, and this time use a 2H. STAGE 4: Now blend the result, but
never blend with your fingers. The natural oil in your skin will leave fingerprints that, like forensic dusting powder, graphite will indelibly stick to - and there's no fix for that!
I use toilet tissue or kitchen paper wrapped around my finger. Kitchen paper absorbs less graphite, but toilet tissue gives a smoother finish, so I'll use that this time. Blend dark to light in tight circular arcs, and avoid the top right corner to preserve your darkest value. Blending will remove graphite. And use a light touch.You're redistributing graphite, not pushing it into the paper.
When you've finished blending, if you've left any blunt ends or hooked ends they'll now be visible, because blending cannot remove them. In fact, blending will
increase their visibility.
So now you know the secrets of seamless shading, and you can break any area down into easily manageable sections - such as this wood. It takes practice, but if there's one drawing skill you'll always be grateful you taught yourself... the tapered line is it.
© copyright: Mike Sibley 2018